A previous post (here) documented how to connect a Python script to a serial port on a microcontroller. This post documents connecting a serial port to the WEB via Node.js (which is a JavaScript runtime).
Using Node.js and a module for node called serialport, it is very easy to connect a PC to a serial port on a microcontroller. First install Node.js (and npm which is the node package manager). Then install the serial port package via:
npm install serialport
NODE.JS to Console Javascript code
Save the following code as serial_port_console.js:
/*
 Node Process for Serial Connection to an Arduino
 Data  Sent and Received is displayed on the console
 From: earl@microcontrollerelectronics.com
*/

const SerialPort = require('serialport')
var stdin        = process.openStdin();
const port       = new SerialPort('/dev/ttyUSB0', {  baudRate: 115200 })

port.on('error', function(err)  { console.log('Error: ', err.message)} )
port.on('data', function (data) { console.log('', data.toString('utf8')) })

stdin.addListener("data", function(data) {
  console.log(data.toString().trim());
  port.write(data);
});
and run it via:
node serial_port_console.js
This is a very simple means to communicate with your serial device just from the console. Data received from the serial device is sent to the console and data typed in on the console is sent to the serial device. Note that the serial port on the PC is hard coded as “/dev/ttyUSB0” and the baud rate is 115200 which should be changed by editing the code to match the connected device.
NODE.JS to WEB Javascript code
Alternatively, use this script for connecting a serial port to the WEB via Node.js:
/*
 Node.js Serial Port Data to Web
 From: earl@microcontrollerelectronics.com
*/

var serport      = "";
var rate         = 115200;
var serports     = [];
var fs           = require('fs');
const SerialPort = require('serialport');

var express = require('express'),
    app    = express(),
    server = require('http').Server(app),
    io     = require('socket.io')(server),
    port   = 8888;

server.listen(port, () => console.log('Server Listening on port' + port))

//app.use(express.static(__dirname));

app.get('*', function(req, res){
  fs.readFile(__dirname + '/index.html','utf8', function (err, data) {
    if (err) {
      res.writeHead(500);
      return res.end('Error loading index.html');
    }
    res.writeHead(200, {'Content-Type' : "text/html; charset=utf-8"});
    var result = data.replace("Node Serial Connection","Node Serial Connection " + serports[0]);
    res.end(result);
  });
});

io.on('connection', onConnection);

var connectedSocket = null;
function onConnection(socket) {
  connectedSocket = socket;
  connectedSocket.on('send', function (data) {
    console.log(data);
    serport.write(data.Data);
  });
 }

if (process.argv.length > 2) {
  console.log(process.argv);
  serports.push(process.argv[2]);
  if (process.argv.length > 3) rate = parseInt(process.argv[3]);
}

SerialPort.list().then(ports => {
  ports.forEach(function(port) {
    if (typeof port['manufacturer'] !== 'undefined') {
      serports.push(port.path);
      console.log(port);
    }
  });
  if (serports.length == 0) {
    console.log("No serial ports found!");
    process.exit();
  }
  serport = new SerialPort(serports[0], {  baudRate: rate })
  serport.on('error', function(err) {
    console.log('Error: ', err.message)
  })
  serport.on('data', function (data) {
    console.log(data.toString('utf8'));
    io.emit('data', { data: data.toString('utf8') });
  })

});
That script also requires an html file to send to the browser:
<!DOCTYPE html>
<html>
<head>
<meta charset="utf-8" />
<title>Node Serial Connection</title>
<script src="/socket.io/socket.io.js"></script>
</head>
<body>
<style>
#text {
  font-family: Arial, Verdana, Helvetica, sans-serif;
  font-size: 14px;
  border: 2px solid blue;
  text-transform: none;
  overflow: auto;
  text-align: left;
  margin-top:4px;
  margin:6px;
  width:97vw;
  border: 2px solid blue;
  height:75vh;
}
.myButton {
        -moz-box-shadow:inset 0px 1px 0px 0px #97c4fe;
        -webkit-box-shadow:inset 0px 1px 0px 0px #97c4fe;
        box-shadow:inset 0px 1px 0px 0px #97c4fe;
        background:-webkit-gradient(linear, left top, left bottom, color-stop(0.05, #3d94f6), color-stop(1, #1e62d0));
        background:-moz-linear-gradient(top, #3d94f6 5%, #1e62d0 100%);
        background:-webkit-linear-gradient(top, #3d94f6 5%, #1e62d0 100%);
        background:-o-linear-gradient(top, #3d94f6 5%, #1e62d0 100%);
        background:-ms-linear-gradient(top, #3d94f6 5%, #1e62d0 100%);
        background:linear-gradient(to bottom, #3d94f6 5%, #1e62d0 100%);
        filter:progid:DXImageTransform.Microsoft.gradient(startColorstr='#3d94f6', endColorstr='#1e62d0',GradientType=0);
        background-color:#3d94f6;
        -moz-border-radius:6px;
        -webkit-border-radius:6px;
        border-radius:6px;
        border:1px solid #337fed;
        display:inline-block;
        cursor:pointer;
        color:#ffffff;
        font-family:Arial;
        font-size:15px;
        font-weight:bold;
        padding:6px 24px;
        text-decoration:none;
        text-shadow:0px 1px 0px #1570cd;
        margin-left:15px;
}
.myButton:hover {
        background:-webkit-gradient(linear, left top, left bottom, color-stop(0.05, #1e62d0), color-stop(1, #3d94f6));
        background:-moz-linear-gradient(top, #1e62d0 5%, #3d94f6 100%);
        background:-webkit-linear-gradient(top, #1e62d0 5%, #3d94f6 100%);
        background:-o-linear-gradient(top, #1e62d0 5%, #3d94f6 100%);
        background:-ms-linear-gradient(top, #1e62d0 5%, #3d94f6 100%);
        background:linear-gradient(to bottom, #1e62d0 5%, #3d94f6 100%);
        filter:progid:DXImageTransform.Microsoft.gradient(startColorstr='#1e62d0', endColorstr='#3d94f6',GradientType=0);
        background-color:#1e62d0;
}
.myButton:active {
        position:relative;
        top:1px;
}
</style>
<div id=text></div>
<div id=tosend>
 <form id=sendform name=sendform>
 <textarea style="margin-top:4px; margin:6px; border:2px solid blue; width:97vw; height:10vh; font-size:20px;"
  id=msg name=msg
 placeholder="Messages appear in the box above. Type in your message here then click 'Send' or press Enter."></textarea>
 <br />
 <input class=myButton type=button name=send  value="Send"  onclick='send_msg("");' />
</form>
</div>
<script>
function send_msg(data) {
  var txt = document.getElementById("msg").value;
  txt = txt + data;
  socket.emit('send', { Data: txt} );
  document.getElementById("msg").value = "";
  document.sendform.msg.focus();
}
function zeroFill(i) { return (i < 10 ? '0' : '') + i }
function now() {
  var d = new Date()
  return d.getFullYear() + '-'
    + zeroFill((d.getMonth() + 1)) + '-'
    + zeroFill(d.getDate())        + ' '
    + zeroFill(d.getHours())       + ':'
    + zeroFill(d.getMinutes())     + ':'
    + zeroFill(d.getSeconds())
}
var text   = document.getElementById('text');
var socket = io.connect('http://localhost:8888');
socket.on('data', function(data) {
//console.log(JSON.stringify(data));
  var msgs  = document.getElementById("text");
  var txt   = msgs.innerHTML;
  var rep   = data.data.replace(/\x0D\x0A/g,"<br />");
  txt       = txt + "<br>" + now() + " " + rep;
  msgs.innerHTML = txt;
  msgs.scrollTop = msgs.scrollHeight;
 });

document.getElementById('msg').addEventListener('keypress', function(event) {
  if (event.keyCode == 13) {  send_msg("\n");  event.preventDefault(); }
});
document.sendform.msg.focus();
</script>
</body>
</html>
Save the Node.Js file as serial_port_web.js and the html file as index.html. This script also requires three other npm modules (fs for reading files, express for the WEB interface and socket.io to maintain a WEB socket connection for the serial data flow).
Install them with: npm install socket.io fs express
Make sure the microcontroller serial device is connected to the PC, then run the script via:
node serial_port_web.js
The serial_port_web.js script will search for the serial port and use what is found at a baud rate of 115200 unless it is over ridden with optional parameters on the command line:
node serial_port_web.js /dev/ttyUSB0 9600
The port is hard coded to 8888 but of course can be changed by editing the code.
When the script is running , copy/paste this URL in the browser:
http://localhost:8888
and this screen should appear:
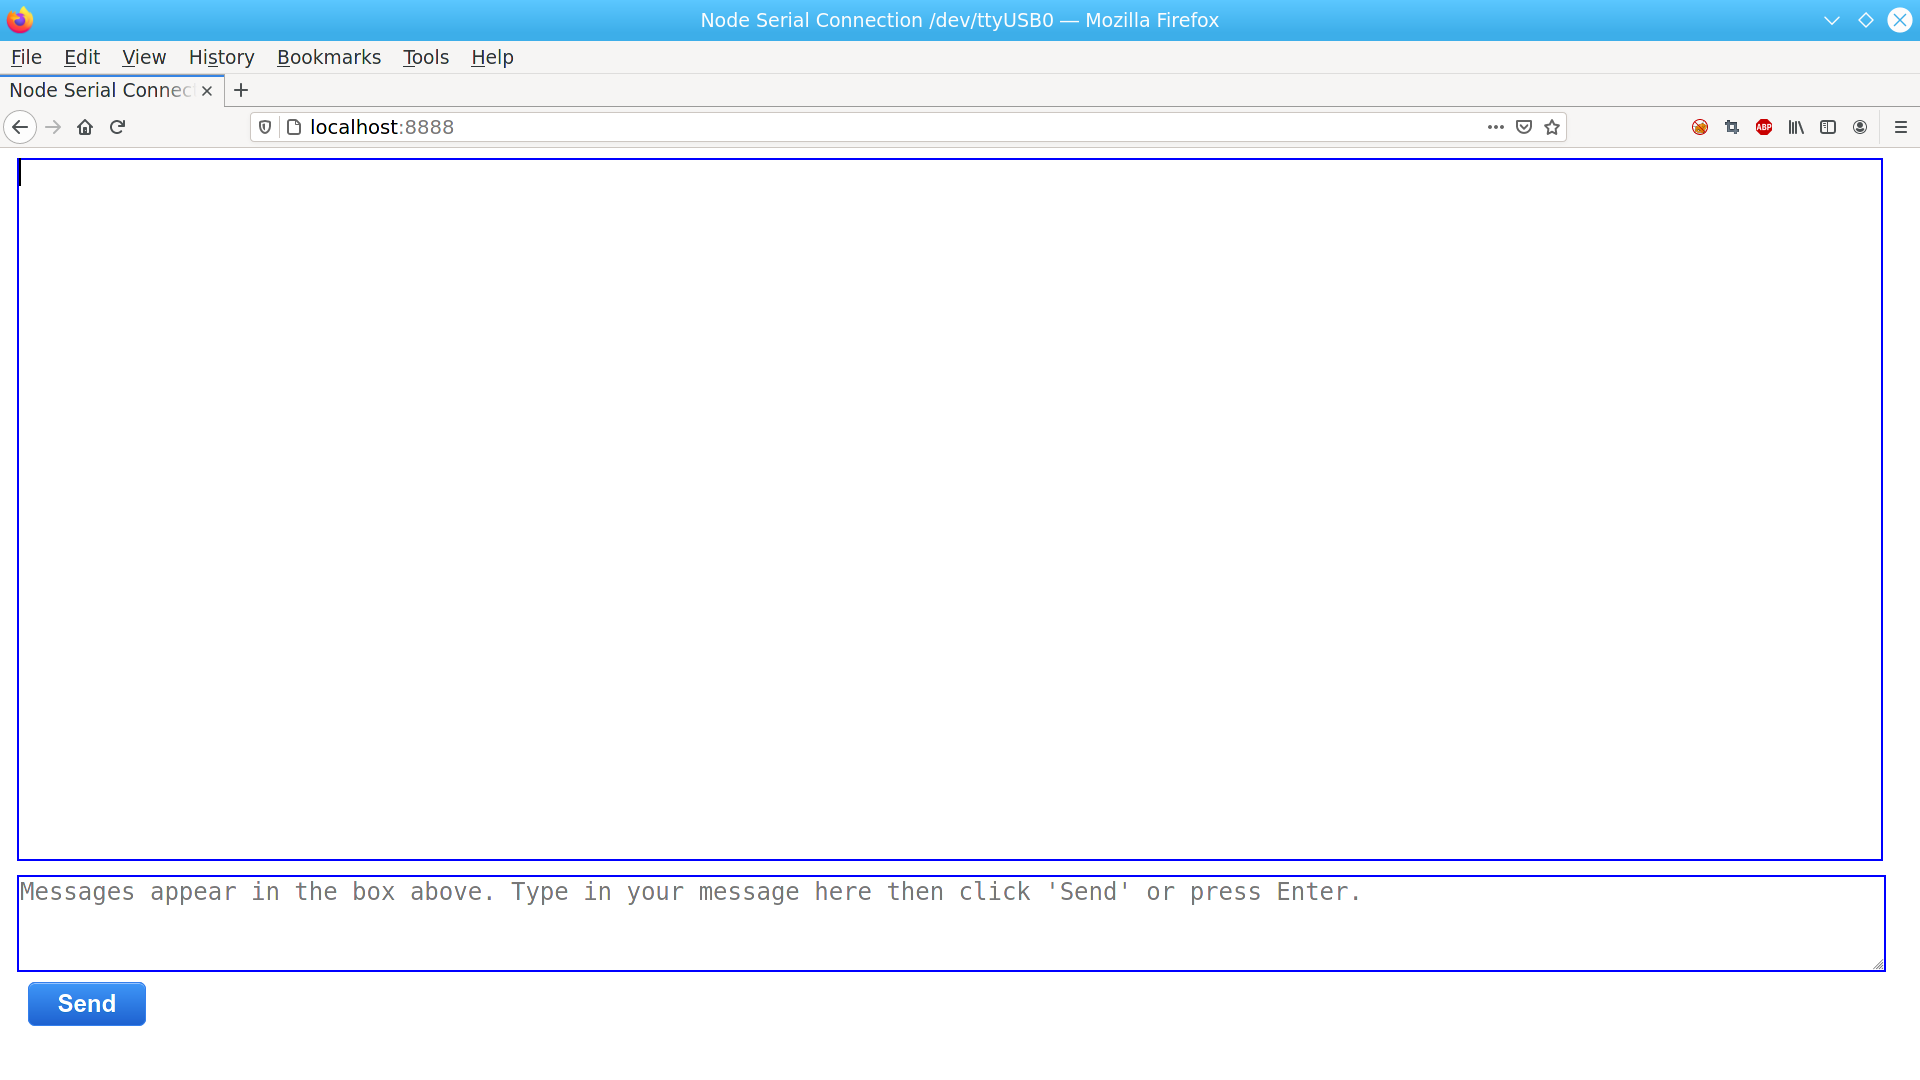 The large top blue box is where the serial data will be displayed (and a time stamp added). The bottom blue box is where data can be typed to send to the serial device. Note that when Enter is pressed, Enter (or as it is called the Carriage Return or Newline character) is sent to the serial device. Pressing the Send button (sends the typed in characters without sending Enter.) Depending on what (code) is running on the serial device, sometimes the Enter is needed and sometimes not.
There is a lot more code in the WEB example, than in the console example, however, the WEB example has more features and presents the data in a ‘prettier’ way. Using the WEB example also allows a remote connection to the serial device if the host computer is connected to the internet.
Recent Comments