
In a previous post (here) , a project was introduced for those of you who use Adobe Lightroom. There is a way to use a MIDI hardware ‘box’ to control various Lightroom actions. I am told that once you use the hardware controls you will never want to go back to the software ones. A Lightroom plugin called MIDI2LR interfaces various MIDI ‘boxes’ to Lightroom. The MIDI box sends MIDI Control/Change commands to MIDI2LR which then changes them into Lightroom actions. More info on MID2LR can be found HERE.
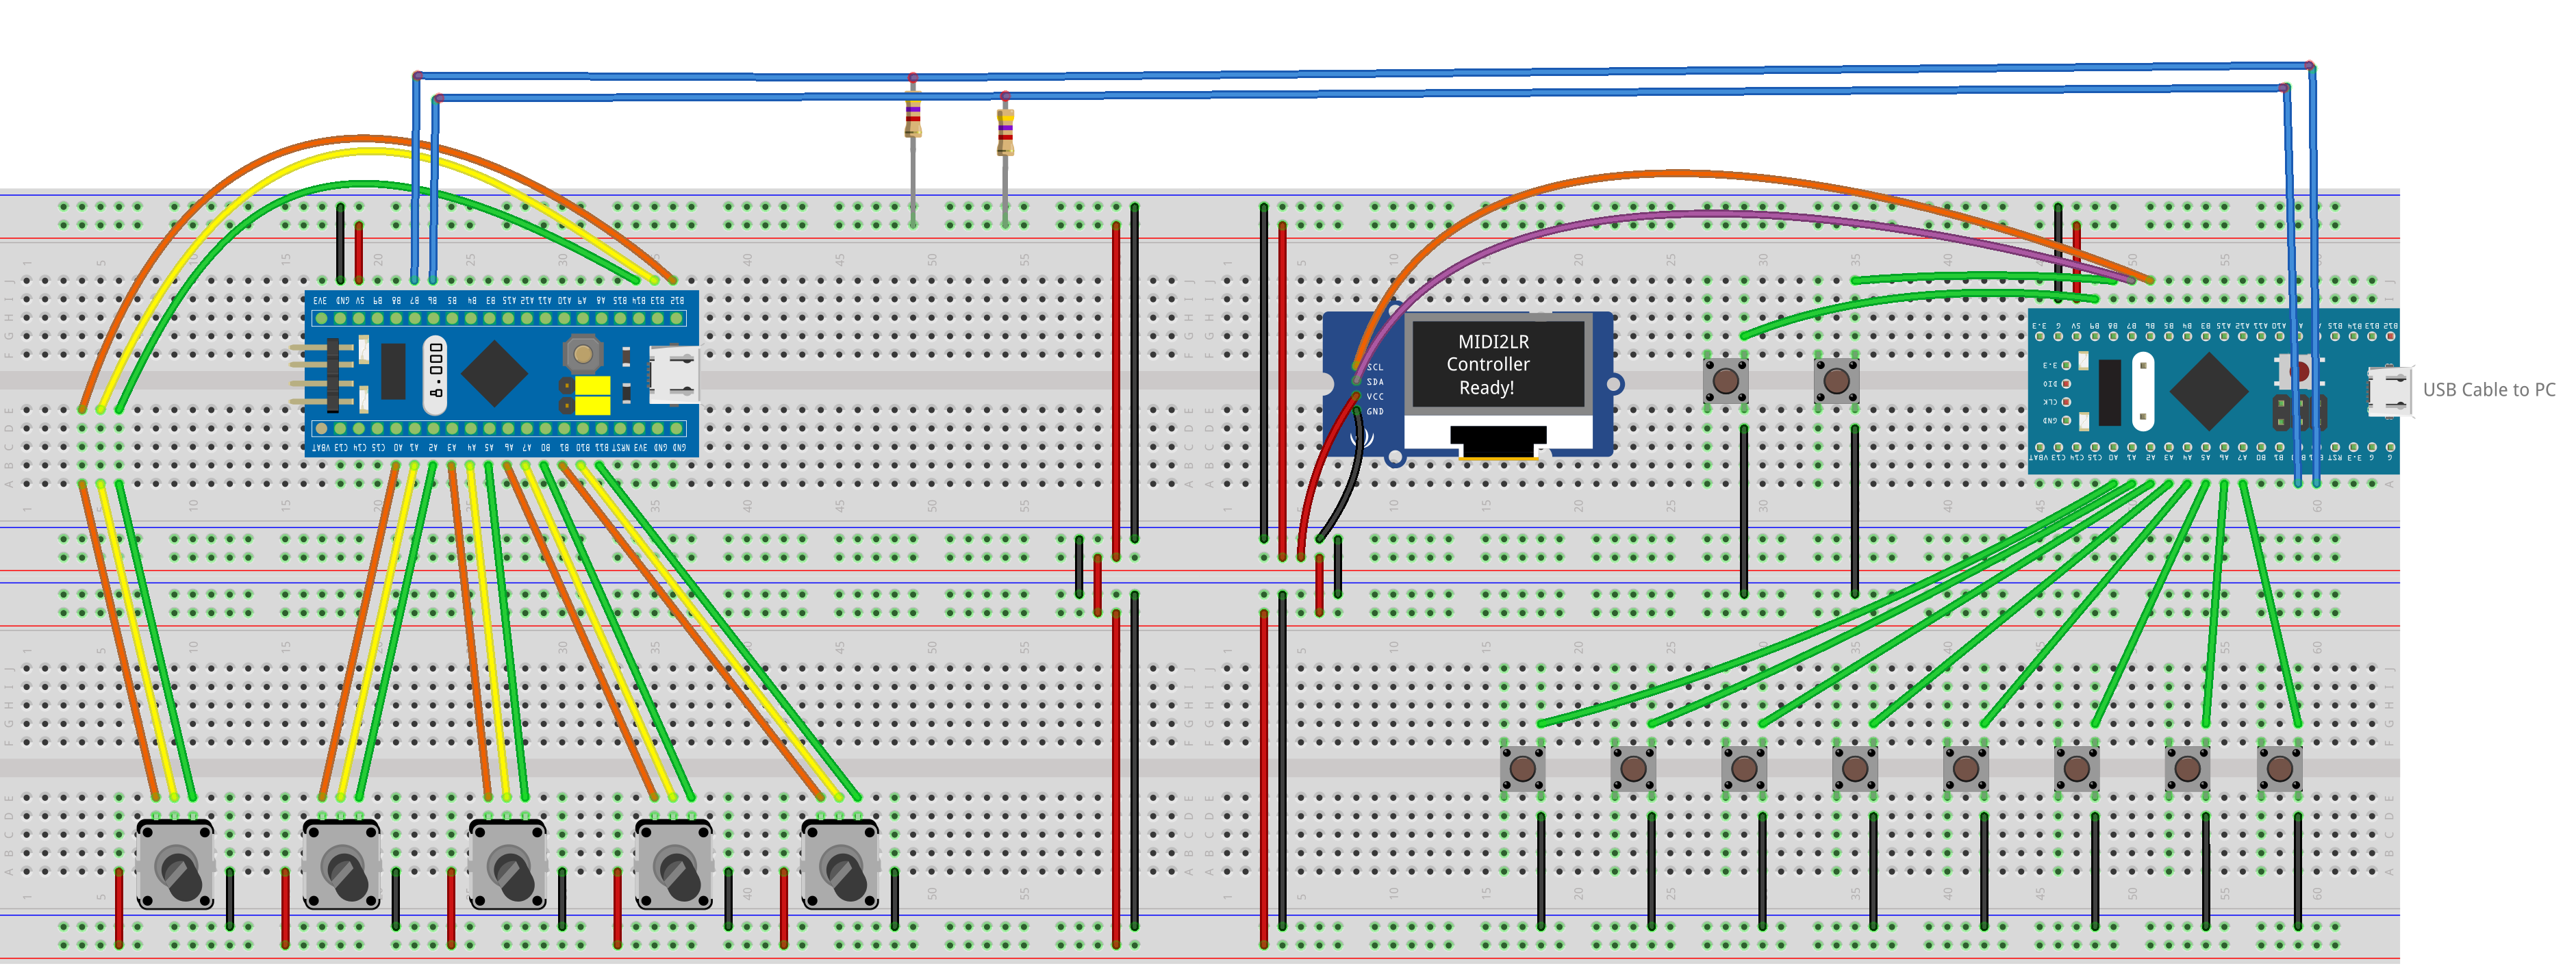
This post continues the project by adding multiple rotary encoders (in addition to the buttons). Here is how things are wired (download the Fritzing.org file for this graphic here):
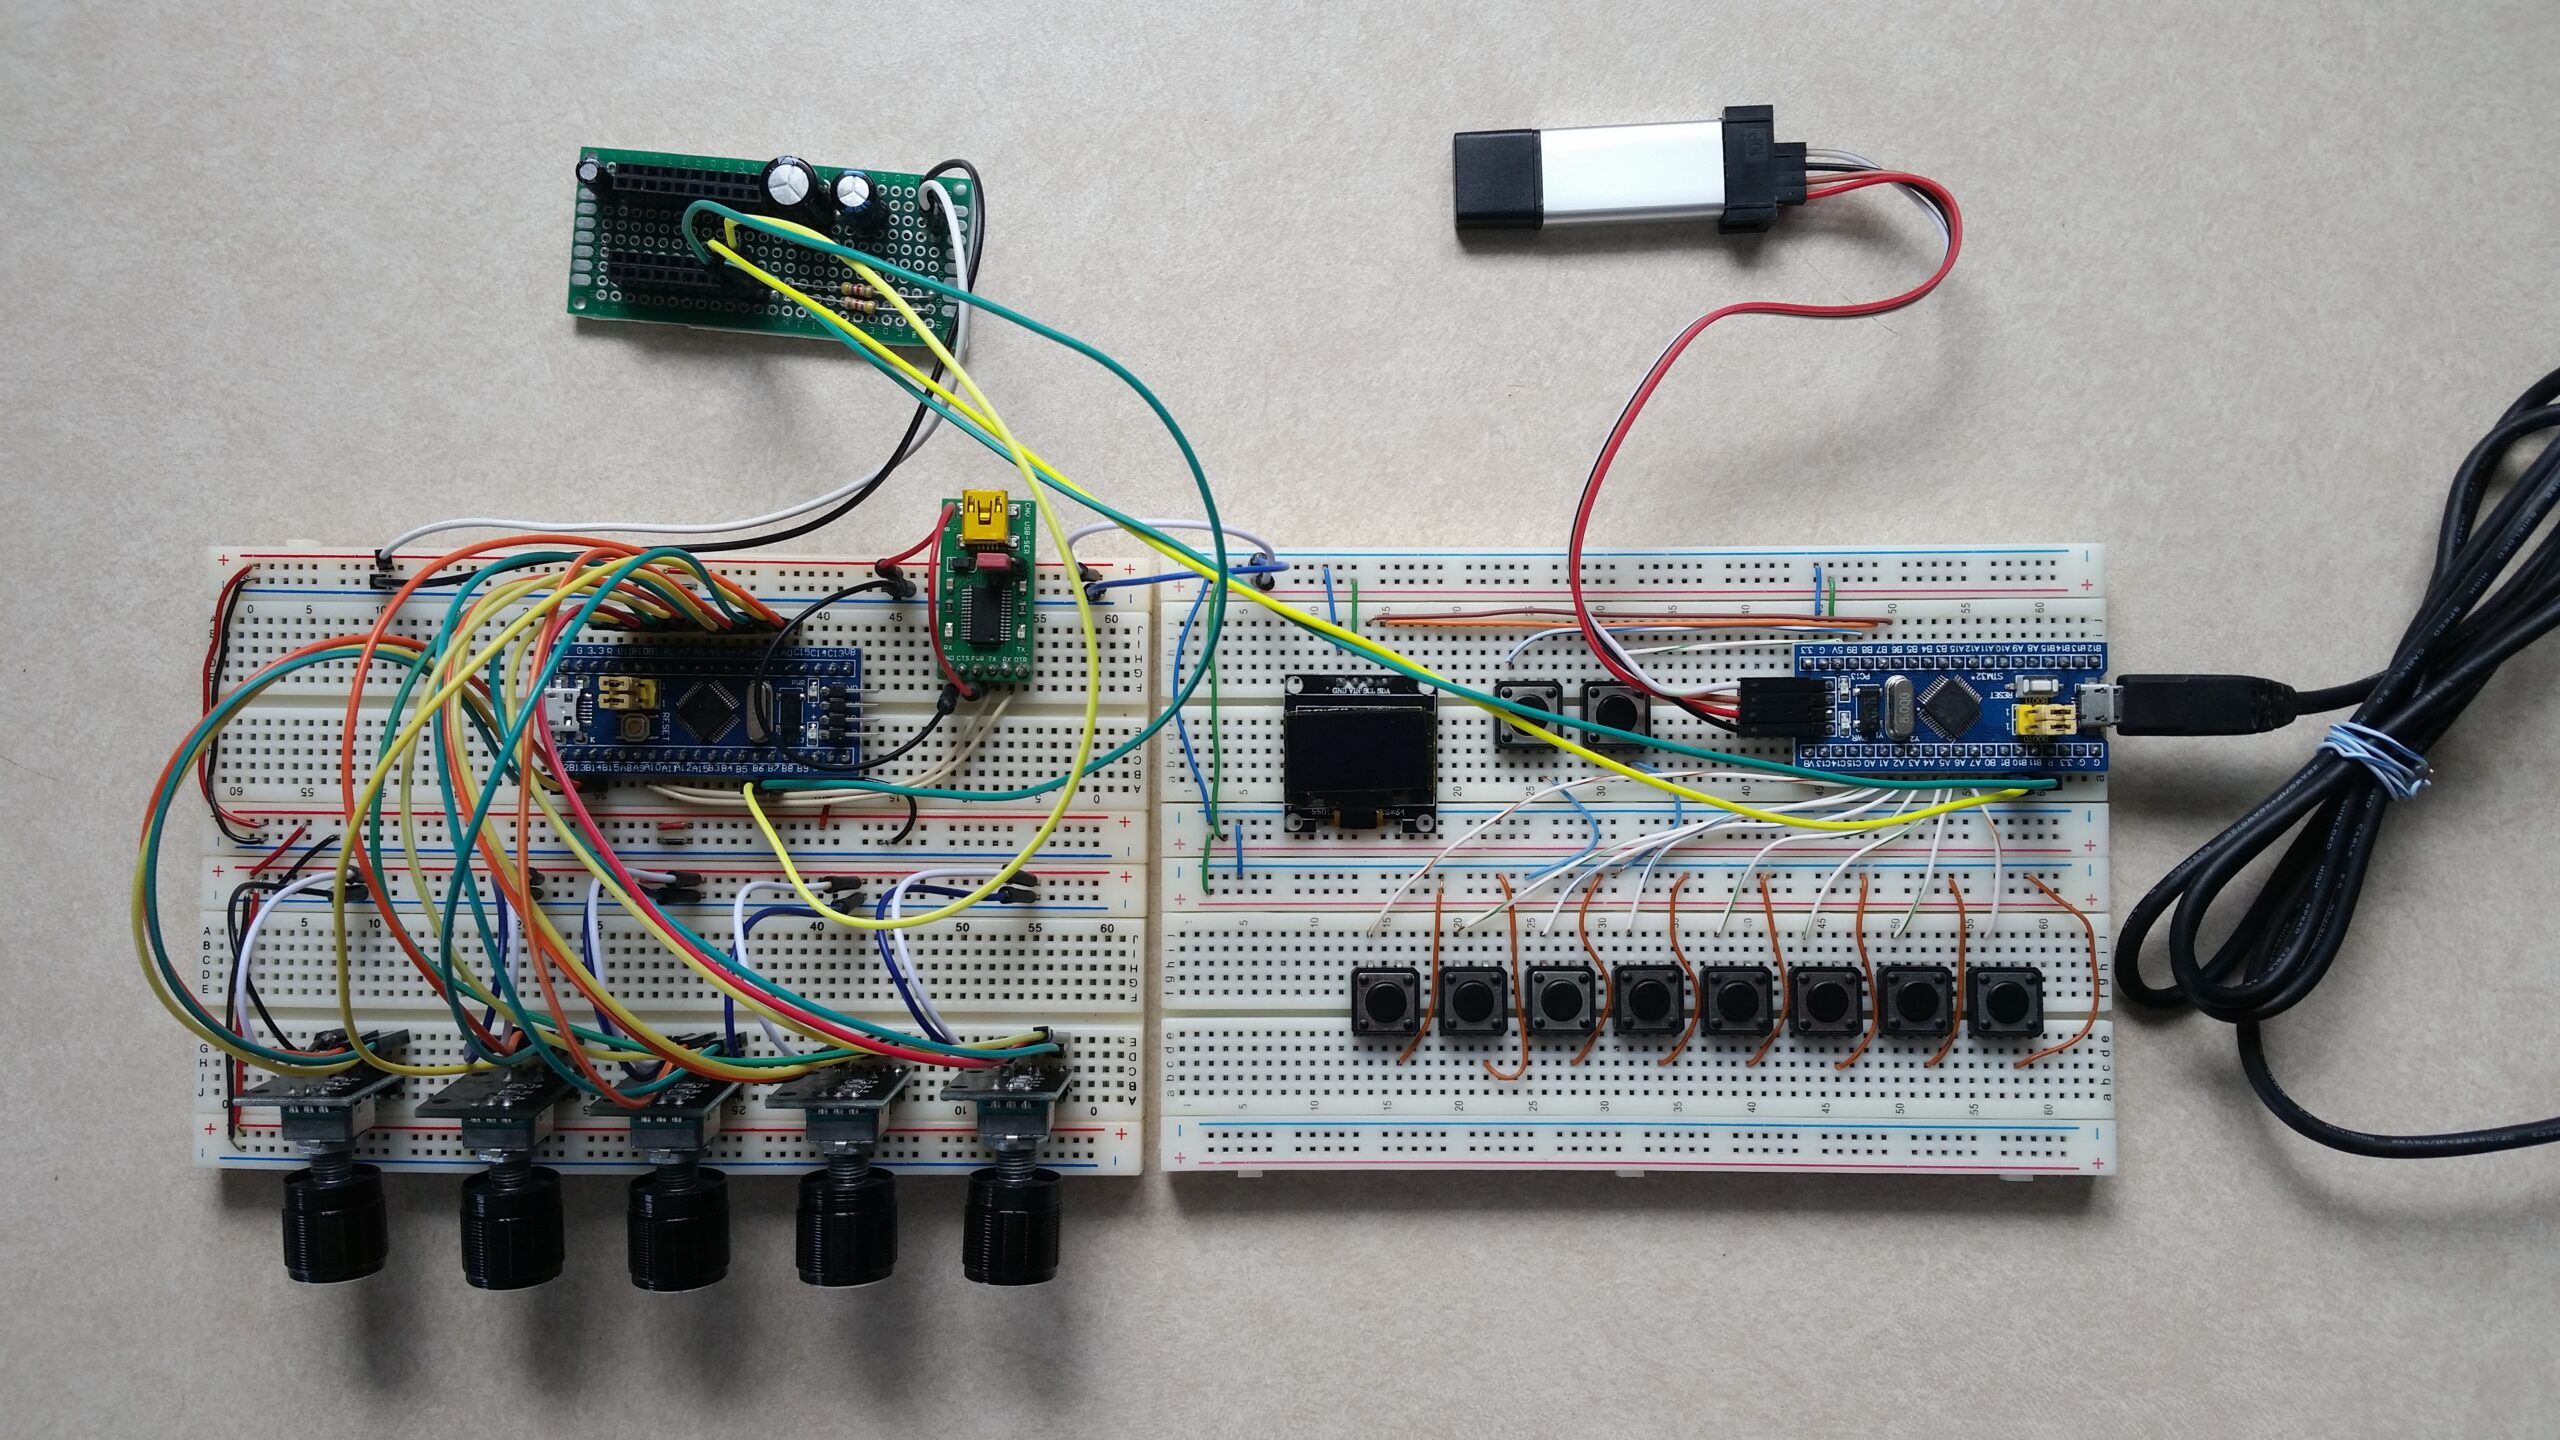
Here is how it actually looks all wired together:
In this project (so far) there are two STM32F103C8 microcontrollers. One contains the MIDI control code and interfaces via USB to the PC. It also controls the OLED screen and buttons. Another one controls the five rotary encoders. A previous post (here) documents the STM32F103C8T6 and interfacing with rotary encoders.
Also shown in the picture above are how the STM32F103C8 microcontrollers are programmed. The one on the left has an FTDI serial-to-usb connector and the one on the right has an ST-Link programmer connected.
The two STM32F103C8 microcontrollers are connected together via I2C (two wires). To add more rotary encoders, just add another STM32F103C8T6 and up to five encoders.
In the above picture, at the top left, is a simple I2C circuit which was introduced in a previous post here. Using that circuit, multiple groups of rotary encoders can be added (each additional STM32F103C8T6 can control up to 5 more encoders).
Here is the code (using the Arduino IDE) to load into the STM32F103C8T6 controlling the USB connection, buttons and OLED:
// From: earl@microcontrollerelectronics.com
// STM32F103C8T6  MIDI Controller
// for the MIDI2LR ADOBE LIGHTROOM PLUGIN

/*
 *            +-----------------[USB]-----------------+
  [SS2|PB12] | [31]                            [Gnd] |
 [SCK2|PB13] | [30]                  +---+     [Gnd] |
[MISO2|PB14] | [29]    +-----+       |0 0|     [3V3] |
[MOSI2|PB15] | [28]    |Reset|       |x x|   [Reset] |
       [PA8] | [27]    +-----+       |1 1|      [ 0] | [PB11|SDA2|RX3]
   [TX1|PA9] | [26]                  +---+      [ 1] | [PB10|SCL2|TX3]
  [RX1|PA10] | [25]                   ^ ^       [33] | [PB1]
 [USB-|PA11] | [24]            Boot1--+ |       [ 3] | [PB0|A0]
 [USB+|PA12] | [23]            Boot0----+       [ 4] | [PA7|A1|MOSI1]
      [PA15] | [20]                             [ 5] | [PA6|A2|MISO1]
       [PB3] | [19]     +---------------+       [ 6] | [PA5|A3|SCK1]
       [PB4] | [18]     | STM32F103C8T6 |       [ 7] | [PA4|A4|SS1]
       [PB5] | [17]     |   Blue Pill   |       [ 8] | [PA3|A5|RX2]
  [SCL1|PB6] | [16]     +---------------+       [ 9] | [PA2|A6|TX2]
  [SDA1|PB7] | [15]                             [10] | [PA1|A7]
       [PB8] | [32]                             [11] | [PA0|A8]
       [PB9] | [PB9]                            [12] | [PC15]
             | [5V]      +---------------+      [13] | [PC14]
             | [Gnd]     |    ST-Link    |      [14] | [PC13|LED]
             | [3V3]     |3V3 DIO CLK GND|     [Vbat]|
             +-------------+---+---+---+-------------+
                           |   |   |   |
*/

#include <USBComposite.h>
#include <Adafruit_GFX.h>
#include <Adafruit_SSD1306_STM32.h>
#include <Wire_slave.h>

#define OLED_RESET PB4
Adafruit_SSD1306 display(OLED_RESET);

USBMIDI midi;
#define LED PC13
#define KeyDelay 200
#define maxChannel 5

const char ManufacturerName[] = "Generic Chinese BluePill";
const char DeviceName[]       = "STM32F103C8T6 Midi Device";
const char DeviceSerial[]     = "00000000000000000001";
const int  ProductId          = 0x0031;
const int  VendorId           = 0x1EAF;

//Button Pins
const uint8   pins[]    = { PA0,PA1,PA2,PA3,PA4,PA5,PA6,PA7};

//Midi Notes for each button
const uint8_t notes[]   = { 0, 1, 2, 3, 4, 5, 6, 7};

//Midi Notes for each Rotary Encoder
const uint8_t renotes[] = { 8, 9, 10, 11, 12 };

//Mide Notes for each Rotary Encoder Button Push
const uint8_t brenotes[] = { 13,14,15,16,17 };

//Number of Rotary Encoders
#define NUMRE (sizeof(renotes) / sizeof(renotes[0]))

#define Menu        PB8
#define Menu_Select PB9
#define I2C_Address 9

const char *menu_items[] = {"Channel","Midi","Reset"};
const int numMenuItems   = 3;

char textline[80];
char rcvline[80];

int channel     = 0;
int midicmd     = 0;
int menuitem    = -1;
int rcvdata     = 0;
String wiredata = "";

unsigned long timer;
const long interval = 5000;
unsigned long currentmillis;

void setup() {
  Wire1.begin(I2C_Address);
  Wire1.onReceive(receiveEvent);
  USBComposite.setManufacturerString(ManufacturerName);
  USBComposite.setProductString(DeviceName);
  USBComposite.setSerialString(DeviceSerial);
  USBComposite.setVendorId(VendorId);
  USBComposite.setProductId(ProductId);

  midi.begin();
  while (!USBComposite);
  for(int i=0;i<8;++i) pinMode(pins[i],INPUT_PULLUP);
  pinMode(Menu,INPUT_PULLUP);
  pinMode(Menu_Select,INPUT_PULLUP);
  pinMode(LED,OUTPUT);
  display.begin(SSD1306_SWITCHCAPVCC, 0x3C);
  timer = millis();
  disptext(0,0,2," MIDI2LR\n\nController\n  Ready!");
}

void disptext(int row, int col, int size, char *text) {
  int i = 0;
  display.clearDisplay();
  display.setTextSize(size);
  display.setTextColor(WHITE);
  display.setCursor(row,col);
  while(text[i] != '\0') {
   if (text[i] == '\n') display.println();
   else display.write(text[i]);
   ++i;
  }
  display.display();
  timer = millis();
}

void loop() {
  currentmillis = millis();

  if ( (currentmillis - timer) > 10000) {
    timer = currentmillis;
    display.clearDisplay();
    display.display();
  }

  if (rcvdata) {
    wiredata = "";
    wiredata += rcvline[0];
    wiredata += rcvline[1];
    int  i = wiredata.toInt();
    i -= 1;
    char f = rcvline[3];

    if ( (i >= 0) && (i <= NUMRE) ) {
      if (f == 'B') {
        sprintf(textline,"%s\nChannel %d\nMidi %s\n%d|%s:%d",
          rcvline,channel,(midicmd ? "CC" : "Note"),channel,(midicmd ? "CC" : "Note"),brenotes[i]
        );
        disptext(0,0,2,textline);
        if (midicmd == 0) {
          midi.sendControlChange(channel, brenotes[i], 127);
          delay(KeyDelay);
          midi.sendControlChange(channel, brenotes[i], 0);
        }
        else {
          midi.sendNoteOn(channel, brenotes[i], 127);
          delay(KeyDelay);
          midi.sendNoteOff(channel, brenotes[i],0);
        }
      }
      else {
        if (f == '+') {
          sprintf(textline,"%s\nChannel %d\nMidi %s\n%d|%s:%d",
            rcvline,channel,(midicmd ? "CC" : "Note"),channel,(midicmd ? "CC" : "Note"),renotes[i]
          );
          disptext(0,0,2,textline);
          midi.sendControlChange(channel, renotes[i], 1);
          delay(KeyDelay);
          midi.sendControlChange(channel, renotes[i], 0);
        }
        else {
          sprintf(textline,"%s\nChannel %d\nMidi %s\n%d|%s:%d",
            rcvline,channel,(midicmd ? "CC" : "Note"),channel,(midicmd ? "CC" : "Note"),renotes[i]
          );
          disptext(0,0,2,textline);
          midi.sendControlChange(channel, renotes[i], 127);
          delay(KeyDelay);
          midi.sendControlChange(channel, renotes[i], 0);
        }
      }
    }
    rcvdata = 0;
  }

  if (digitalRead(Menu) == LOW) {
    while(digitalRead(Menu) == LOW) delay(50);
    ++menuitem;
    if (menuitem >= numMenuItems) menuitem = 0;
    sprintf(textline,"Menu Item\n%s",menu_items[menuitem]);
    disptext(0,0,2,textline);
  }

  if (digitalRead(Menu_Select) == LOW) {
    if (menuitem == 0) {
      channel += 1;
      if (channel >= maxChannel) channel = 0;
      sprintf(textline,"Select\n%s\nMidi %s\nChannel %d",menu_items[menuitem],(midicmd ? "CC" : "Note"),channel);
    }
    if (menuitem == 1) {
      if (midicmd == 0) midicmd = 1;
      else              midicmd = 0;
      sprintf(textline,"Select\n%s\nMidi %s\nChannel %d",menu_items[menuitem],(midicmd ? "CC" : "Note"),channel);
    }
    if (menuitem == 2) {
      midicmd = 0;
      channel = 0;
      sprintf(textline,"Menu\nReset\nMidi %s\nChannel %d",(midicmd ? "CC" : "Note"),channel);
    }
    while(digitalRead(Menu_Select) == LOW) delay(50);
    disptext(0,0,2,textline);
  }

  for(int i=0;i<8;++i) {
    if (digitalRead(pins[i]) == LOW) {
      digitalWrite(LED,!digitalRead(LED));
      sprintf(textline,
        "Button %d\nChannel %d\nMidi %s\n%d|%s:%d",
        pins[i],channel,(midicmd ? "CC" : "Note"),channel,(midicmd ? "CC" : "Note"),notes[i]
      );
      disptext(0,0,2,textline);
      if (midicmd == 0) {
         midi.sendControlChange(channel, notes[i], 127);
         delay(KeyDelay);
         midi.sendControlChange(channel, notes[i], 0);
      }
      else {
        midi.sendNoteOn(channel, notes[i], 127);
        delay(KeyDelay);
        midi.sendNoteOff(channel, notes[i],0);
      }
      while(digitalRead(pins[i]) == LOW) delay(50);
    }
  }
}

void receiveEvent(int howMany) {
  int c = 0;
  digitalWrite(PC13,!digitalRead(PC13));
  while(Wire1.available()) { rcvline[c] = char(Wire1.read()); ++c; }
  rcvline[c] = '\0';
  rcvdata = 1;
}
Note: The above code is an enhanced version from the previous post (here) were this project was only using buttons.
Here is the code to load into the STM32F103C8T6 which controls the rotary encoders:
//From: earl@microcontrollerelectronics.com
/*
             +-----------------[USB]-----------------+
  [SS2|PB12] | [31]                            [Gnd] |
 [SCK2|PB13] | [30]                  +---+     [Gnd] |
[MISO2|PB14] | [29]    +-----+       |0 0|     [3V3] |
[MOSI2|PB15] | [28]    |Reset|       |x x|   [Reset] |
       [PA8] | [27]    +-----+       |1 1|      [ 0] | [PB11|SDA2|RX3]
   [TX1|PA9] | [26]                  +---+      [ 1] | [PB10|SCL2|TX3]
  [RX1|PA10] | [25]                   ^ ^       [33] | [PB1]
 [USB-|PA11] | [24]            Boot1--+ |       [ 3] | [PB0|A0]
 [USB+|PA12] | [23]            Boot0----+       [ 4] | [PA7|A1|MOSI1]
      [PA15] | [20]                             [ 5] | [PA6|A2|MISO1]
       [PB3] | [19]        +-----------+        [ 6] | [PA5|A3|SCK1]
       [PB4] | [18]        | STM32F103 |        [ 7] | [PA4|A4|SS1]
       [PB5] | [17]        | Blue Pill |        [ 8] | [PA3|A5|RX2]
  [SCL1|PB6] | [16]        +-----------+        [ 9] | [PA2|A6|TX2]
  [SDA1|PB7] | [15]                             [10] | [PA1|A7]
       [PB8] | [32]                             [11] | [PA0|A8]
       [PB9] | [PB9]                            [12] | [PC15]
             | [5V]      +---------------+      [13] | [PC14]
             | [Gnd]     |    ST-Link    |      [14] | [PC13|LED]
             | [3V3]     |3V3 DIO CLK GND|     [Vbat]|
             +-------------+---+---+---+-------------+
                           |   |   |   |

PA9  TX / PA10 RX Serial Upload Serial
PA2  TX / PA3  RX Serial1
PB10 TX / PB11 RX Serial2

*/

#include <Wire.h>
#define I2C_ADDR  9

// Pins are wired CLK,DT,SW,CLK,DT,SW ..

const uint8_t pins[] = {
  PB12,PB13,PB14,
  PA2,PA1,PA0,
  PA5,PA4,PA3,
  PB0,PA7,PA6,
  PB11,PB10,PB1
};

#define NUMPINS (sizeof(pins) / sizeof(pins[0]))
#define NUMRE (NUMPINS / 3)

int state[]     = {0,0,0,0,0};
int laststate[] = {0,0,0,0,0};
int counter[]   = {0,0,0,0,0};
char buf[80];

void setup() {
  delay(1000);
  Wire.begin();
//  Serial.begin (115200);
  for(int i=0,j=0,k=1,b=2;i<NUMRE;++i,j+=3,k+=3,b+=3) {
    pinMode(pins[j],INPUT);
    pinMode(pins[k],INPUT);
    pinMode(pins[b],INPUT_PULLUP);
  }
  for(int i=0,j=0;i<NUMRE;++i,j+=3) laststate[i] = digitalRead(pins[j]);
}

void loop() {
  for(int i=0,j=0,k=1,b=2;i<NUMRE;++i,j+=3,k+=3,b+=3) {
    state[i] = digitalRead(pins[j]);
    if (laststate[i] != state[i]) {
      if (digitalRead(pins[k]) != state[i]) {
        ++counter[i];
        sprintf(buf,"%02d:+ %d",i+1,counter[i]);
      }
      else {
        --counter[i];
        sprintf(buf,"%02d:- %d",i+1,counter[i]);
      }
//    Serial.println(buf);
      Wire.beginTransmission(I2C_ADDR);
      Wire.write(buf);
      Wire.endTransmission();
    }
    laststate[i] = state[i];
    if (digitalRead(pins[b]) == LOW) {
       sprintf(buf,"%02d:B",i+1);
//     Serial.println(buf);
       Wire.beginTransmission(I2C_ADDR);
       Wire.write(buf);
       Wire.endTransmission();
       while(digitalRead(pins[b]) == LOW);
       delay(50);
    }
  }
}
Note: those two sketches will need to be updated if more encoders are added.
Once the code is sent/loaded into the two microcontrollers, just plug in the USB-micro cable (shown in the picture on the right) to your Windows 10 PC and it will be added as an audio device (no drivers are needed as it is automatically recognized). Install the MIDI2LR plugin and while in Lightroom you can test out the button and rotary encoder functions and customize the functionality.
Next up for this project is a custom case, cleaning up the wiring and adding more encoders! Stay tuned!
Recent Comments