
For those of you who use Adobe Lightroom, there is a way to use a MIDI hardware ‘box’ to control various Lightroom actions. I am told that once you use the hardware controls you will never want to go back to the software ones. There is a Lightroom plugin called MIDI2LR which interfaces various MIDI ‘boxes’ to Lightroom. The MIDI box sends MIDI Control/Change commands to MIDI2LR which then changes them into Lightroom actions. More info on MID2LR can be found HERE.
There are several commercial MIDI controllers which do work with MID2LR, however, features and functionality differ. Since the whole idea for using the hardware controls is ease of use and productivity, I would think that Lightroom enthusiasts would want a means of creating a custom hardware solution.
It is actually relatively easy to create an STM32F103C8T6 based MIDI Controller for MIDI2LR. As a proof of concept, I built one on a breadboard to demonstrate what can be done. Here is the design layout:
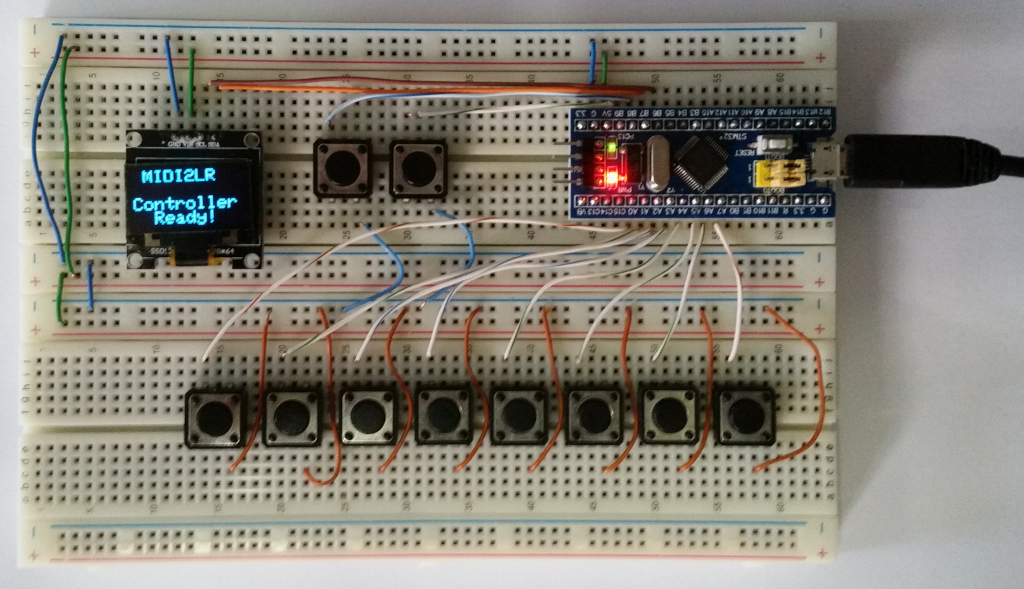
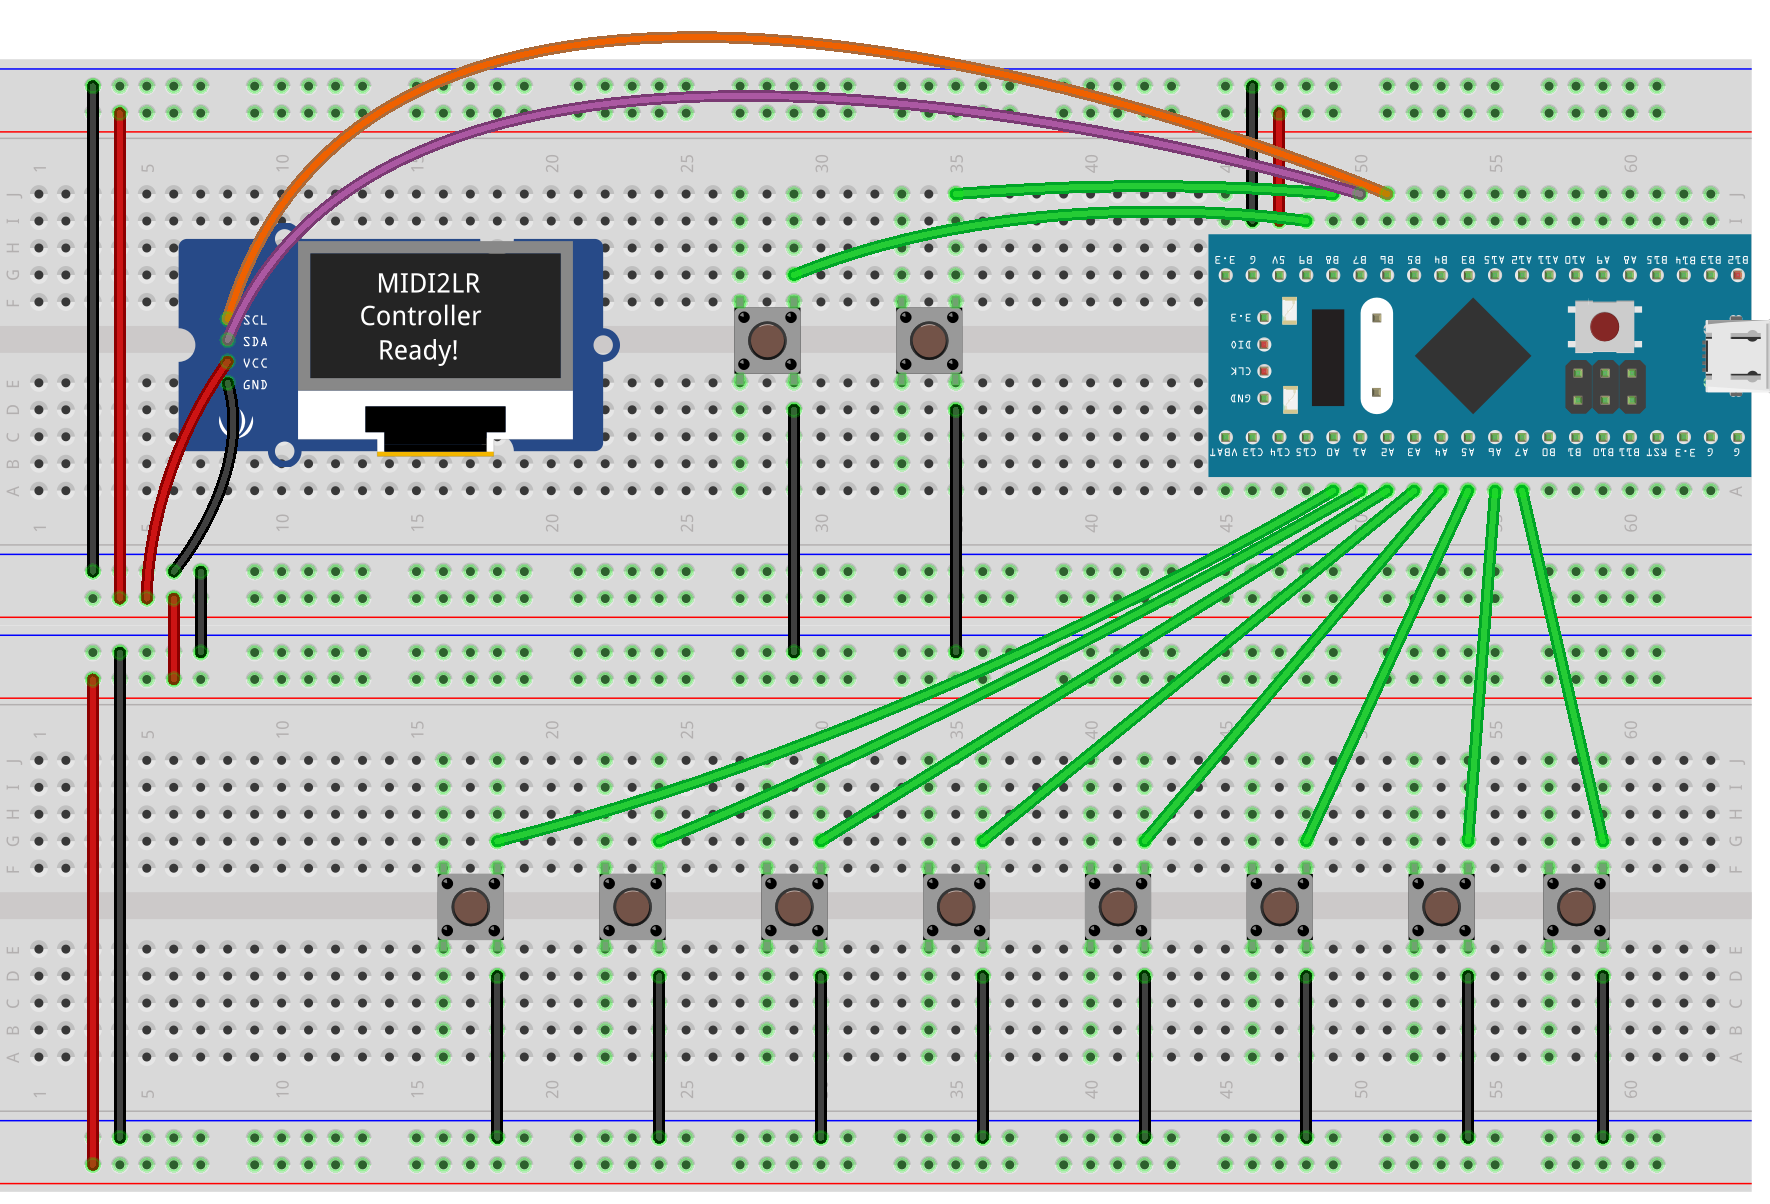 Download the Fritzing diagram source code HERE. And here is what it looks like all wired together:
The two buttons next to the display are used to control menu selections. The menu is used to set whether the buttons send MIDI Notes or Change/Control commands and also is used to select up to 5 channels. Therefore with the 8 buttons x ( 5 channels) x 2 (Note vs. CC commands), there is a possibility of 80 different commands to send to MIDI2LR. The 5 channels is arbitrary and of course changeable in the code so possibilities are only limited by practicality. When a button is pressed, the MIDI CC/Note is sent to MIDI2LR and displayed on the OLED screen.
The code below was developed and sent to the STM32F103C8T6 via the Arduino IDE:
// STM32F103C8T6  MIDI Controller
// for the MIDI2LR ADOBE LIGHTROOM PLUGIN
// from earl@microcontrollerelectronics.com

/*
 *            +-----------------[USB]-----------------+
  [SS2|PB12] | [31]                            [Gnd] |
 [SCK2|PB13] | [30]                  +---+     [Gnd] |
[MISO2|PB14] | [29]    +-----+       |0 0|     [3V3] |
[MOSI2|PB15] | [28]    |Reset|       |x x|   [Reset] |
       [PA8] | [27]    +-----+       |1 1|      [ 0] | [PB11|SDA2|RX3]
   [TX1|PA9] | [26]                  +---+      [ 1] | [PB10|SCL2|TX3]
  [RX1|PA10] | [25]                   ^ ^       [33] | [PB1]
 [USB-|PA11] | [24]            Boot1--+ |       [ 3] | [PB0|A0]
 [USB+|PA12] | [23]            Boot0----+       [ 4] | [PA7|A1|MOSI1]
      [PA15] | [20]                             [ 5] | [PA6|A2|MISO1]
       [PB3] | [19]     +---------------+       [ 6] | [PA5|A3|SCK1]
       [PB4] | [18]     | STM32F103C8T6 |       [ 7] | [PA4|A4|SS1]
       [PB5] | [17]     |   Blue Pill   |       [ 8] | [PA3|A5|RX2]
  [SCL1|PB6] | [16]     +---------------+       [ 9] | [PA2|A6|TX2]
  [SDA1|PB7] | [15]                             [10] | [PA1|A7]
       [PB8] | [32]                             [11] | [PA0|A8]
       [PB9] | [PB9]                            [12] | [PC15]
             | [5V]      +---------------+      [13] | [PC14]
             | [Gnd]     |    ST-Link    |      [14] | [PC13|LED]
             | [3V3]     |3V3 DIO CLK GND|     [Vbat]|
             +-------------+---+---+---+-------------+
                           |   |   |   |
*/

#include <USBComposite.h>

#include <Adafruit_GFX.h>
#include <Adafruit_SSD1306_STM32.h>

#define OLED_RESET PB4
Adafruit_SSD1306 display(OLED_RESET);

USBMIDI midi;
#define LED PC13
#define KeyDelay 200
#define maxChannel 5

const char ManufacturerName[] = "Generic Chinese BluePill";
const char DeviceName[]       = "STM32F103C8T6 Midi Device";
const char DeviceSerial[]     = "00000000000000000001";
const int  ProductId          = 0x0031;
const int  VendorId           = 0x1EAF;

const uint8 pins[]    = { PA0,PA1,PA2,PA3,PA4,PA5,PA6,PA7};
const uint8_t notes[] = { 0, 1, 2, 3, 4, 5, 6, 7};

#define Menu        PB8
#define Menu_Select PB9

const char *menu_items[] = {"Channel","Midi","Reset"};
const int numMenuItems   = 3;

char textline[80];

int channel  = 0;
int midicmd  = 0;
int menuitem = -1;

unsigned long timer;
const long interval = 5000;
unsigned long currentmillis;

void setup() {

  USBComposite.setManufacturerString(ManufacturerName);
  USBComposite.setProductString(DeviceName);
  USBComposite.setSerialString(DeviceSerial);
  USBComposite.setVendorId(VendorId);
  USBComposite.setProductId(ProductId);

  midi.begin();
  while (!USBComposite);
  for(int i=0;i<8;++i) pinMode(pins[i],INPUT_PULLUP);
  pinMode(Menu,INPUT_PULLUP);
  pinMode(Menu_Select,INPUT_PULLUP);
  pinMode(LED,OUTPUT);
  display.begin(SSD1306_SWITCHCAPVCC, 0x3C);
  timer = millis();
  disptext(0,0,2," MIDI2LR\n\nController\n  Ready!");
}

void disptext(int row, int col, int size, char *text) {
  int i = 0;
  display.clearDisplay();
  display.setTextSize(size);
  display.setTextColor(WHITE);
  display.setCursor(row,col);
  while(text[i] != '\0') {
   if (text[i] == '\n') display.println();
   else display.write(text[i]);
   ++i;
  }
  display.display();
  timer = millis();
}

void loop() {
  currentmillis = millis();

  if ( (currentmillis - timer) > 10000) {
    timer = currentmillis;
    display.clearDisplay();
    display.display();
  }

  if (digitalRead(Menu) == LOW) {
    while(digitalRead(Menu) == LOW) delay(50);
    ++menuitem;
    if (menuitem >= numMenuItems) menuitem = 0;
    sprintf(textline,"Menu Item\n%s",menu_items[menuitem]);
    disptext(0,0,2,textline);
  }

  if (digitalRead(Menu_Select) == LOW) {
    if (menuitem == 0) {
      channel += 1;
      if (channel >= maxChannel) channel = 0;
      sprintf(textline,"Select\n%s\nMidi %s\nChannel %d",menu_items[menuitem],(midicmd ? "CC" : "Note"),channel);
    }
    if (menuitem == 1) {
      if (midicmd == 0) midicmd = 1;
      else              midicmd = 0;
      sprintf(textline,"Select\n%s\nMidi %s\nChannel %d",menu_items[menuitem],(midicmd ? "CC" : "Note"),channel);
    }
    if (menuitem == 2) {
      midicmd = 0;
      channel = 0;
      sprintf(textline,"Menu\nReset\nMidi %s\nChannel %d",(midicmd ? "CC" : "Note"),channel);
    }
    while(digitalRead(Menu_Select) == LOW) delay(50);
    disptext(0,0,2,textline);
  }

  for(int i=0;i<8;++i) {
    if (digitalRead(pins[i]) == LOW) {
      digitalWrite(LED,!digitalRead(LED));
      sprintf(textline,
        "Button %d\nChannel %d\nMidi %s\n%d|%s:%d",
        pins[i],channel,(midicmd ? "CC" : "Note"),channel,(midicmd ? "CC" : "Note"),notes[i]
      );
      disptext(0,0,2,textline);
      if (midicmd == 0) {
         midi.sendControlChange(channel, notes[i], 127);
         delay(KeyDelay);
         midi.sendControlChange(channel, notes[i], 0);
      }
      else {
        midi.sendNoteOn(channel, notes[i], 127);
        delay(KeyDelay);
        midi.sendNoteOff(channel, notes[i],0);
      }
      while(digitalRead(pins[i]) == LOW) delay(50);
    }
  }
}
The Arduino IDE was used to develop and program the STM32F103C8T6. The IDE was also customized to use the Arduino Core for STM32 MCUs. Also note the use of the Adafruit graphics libraries to control the OLED display.
Once the code is sent, just plug in the STM32F103C8T6 via an USB-micro cable to your Windows 10 PC and it will be added as an audio device (no drivers are needed as it is automatically recognized). Install the MIDI2LR plugin and while in Lightroom you can test out the button functions and customize the functionality.
You might say that buttons are OK but dials (rotary encoders) are what is missing. You are right, that is what is being planned for in the next step of this project. Stay tuned!
1 comments
thanx, good stuff !