
There are several tutorials on the internet showing how to convert an STM32F103C8T6 into a Black Magic Probe. Unfortunately, none of them worked for me. So, I decided to write this post in case others run into the same problem as I did. The problem I ran into was the memory size of the STM32F103C8T6 chip I am using. It reports that it only has 64K of flash. The Black Magic Probe software is a bit larger than 64K so the utilities report there is not enough memory and stop. Decoding Preview Changes (opens in a new tab)‘STM32F103C8T6’
| STM | STMicroelectronics – Vendor |
|---|---|
| 32 | 32-bit, ARM series |
| F103 | model, ‘F1’ = ARM Cortex M3 |
| C | 48-pins |
| 8 | 64 KB flash memory |
| T | LQFP package type |
| 6 | temperature range -40..+85 °C |
we see that it is only supposed to have 64K, however, it probably has 128K. Mine does! So, with a bit of ‘trickery’, we can make it work.
There are possibly three different ways to connect and interface with the STM32F103C8T6 board:
- Serial port
- USB
- JTAG / SWD
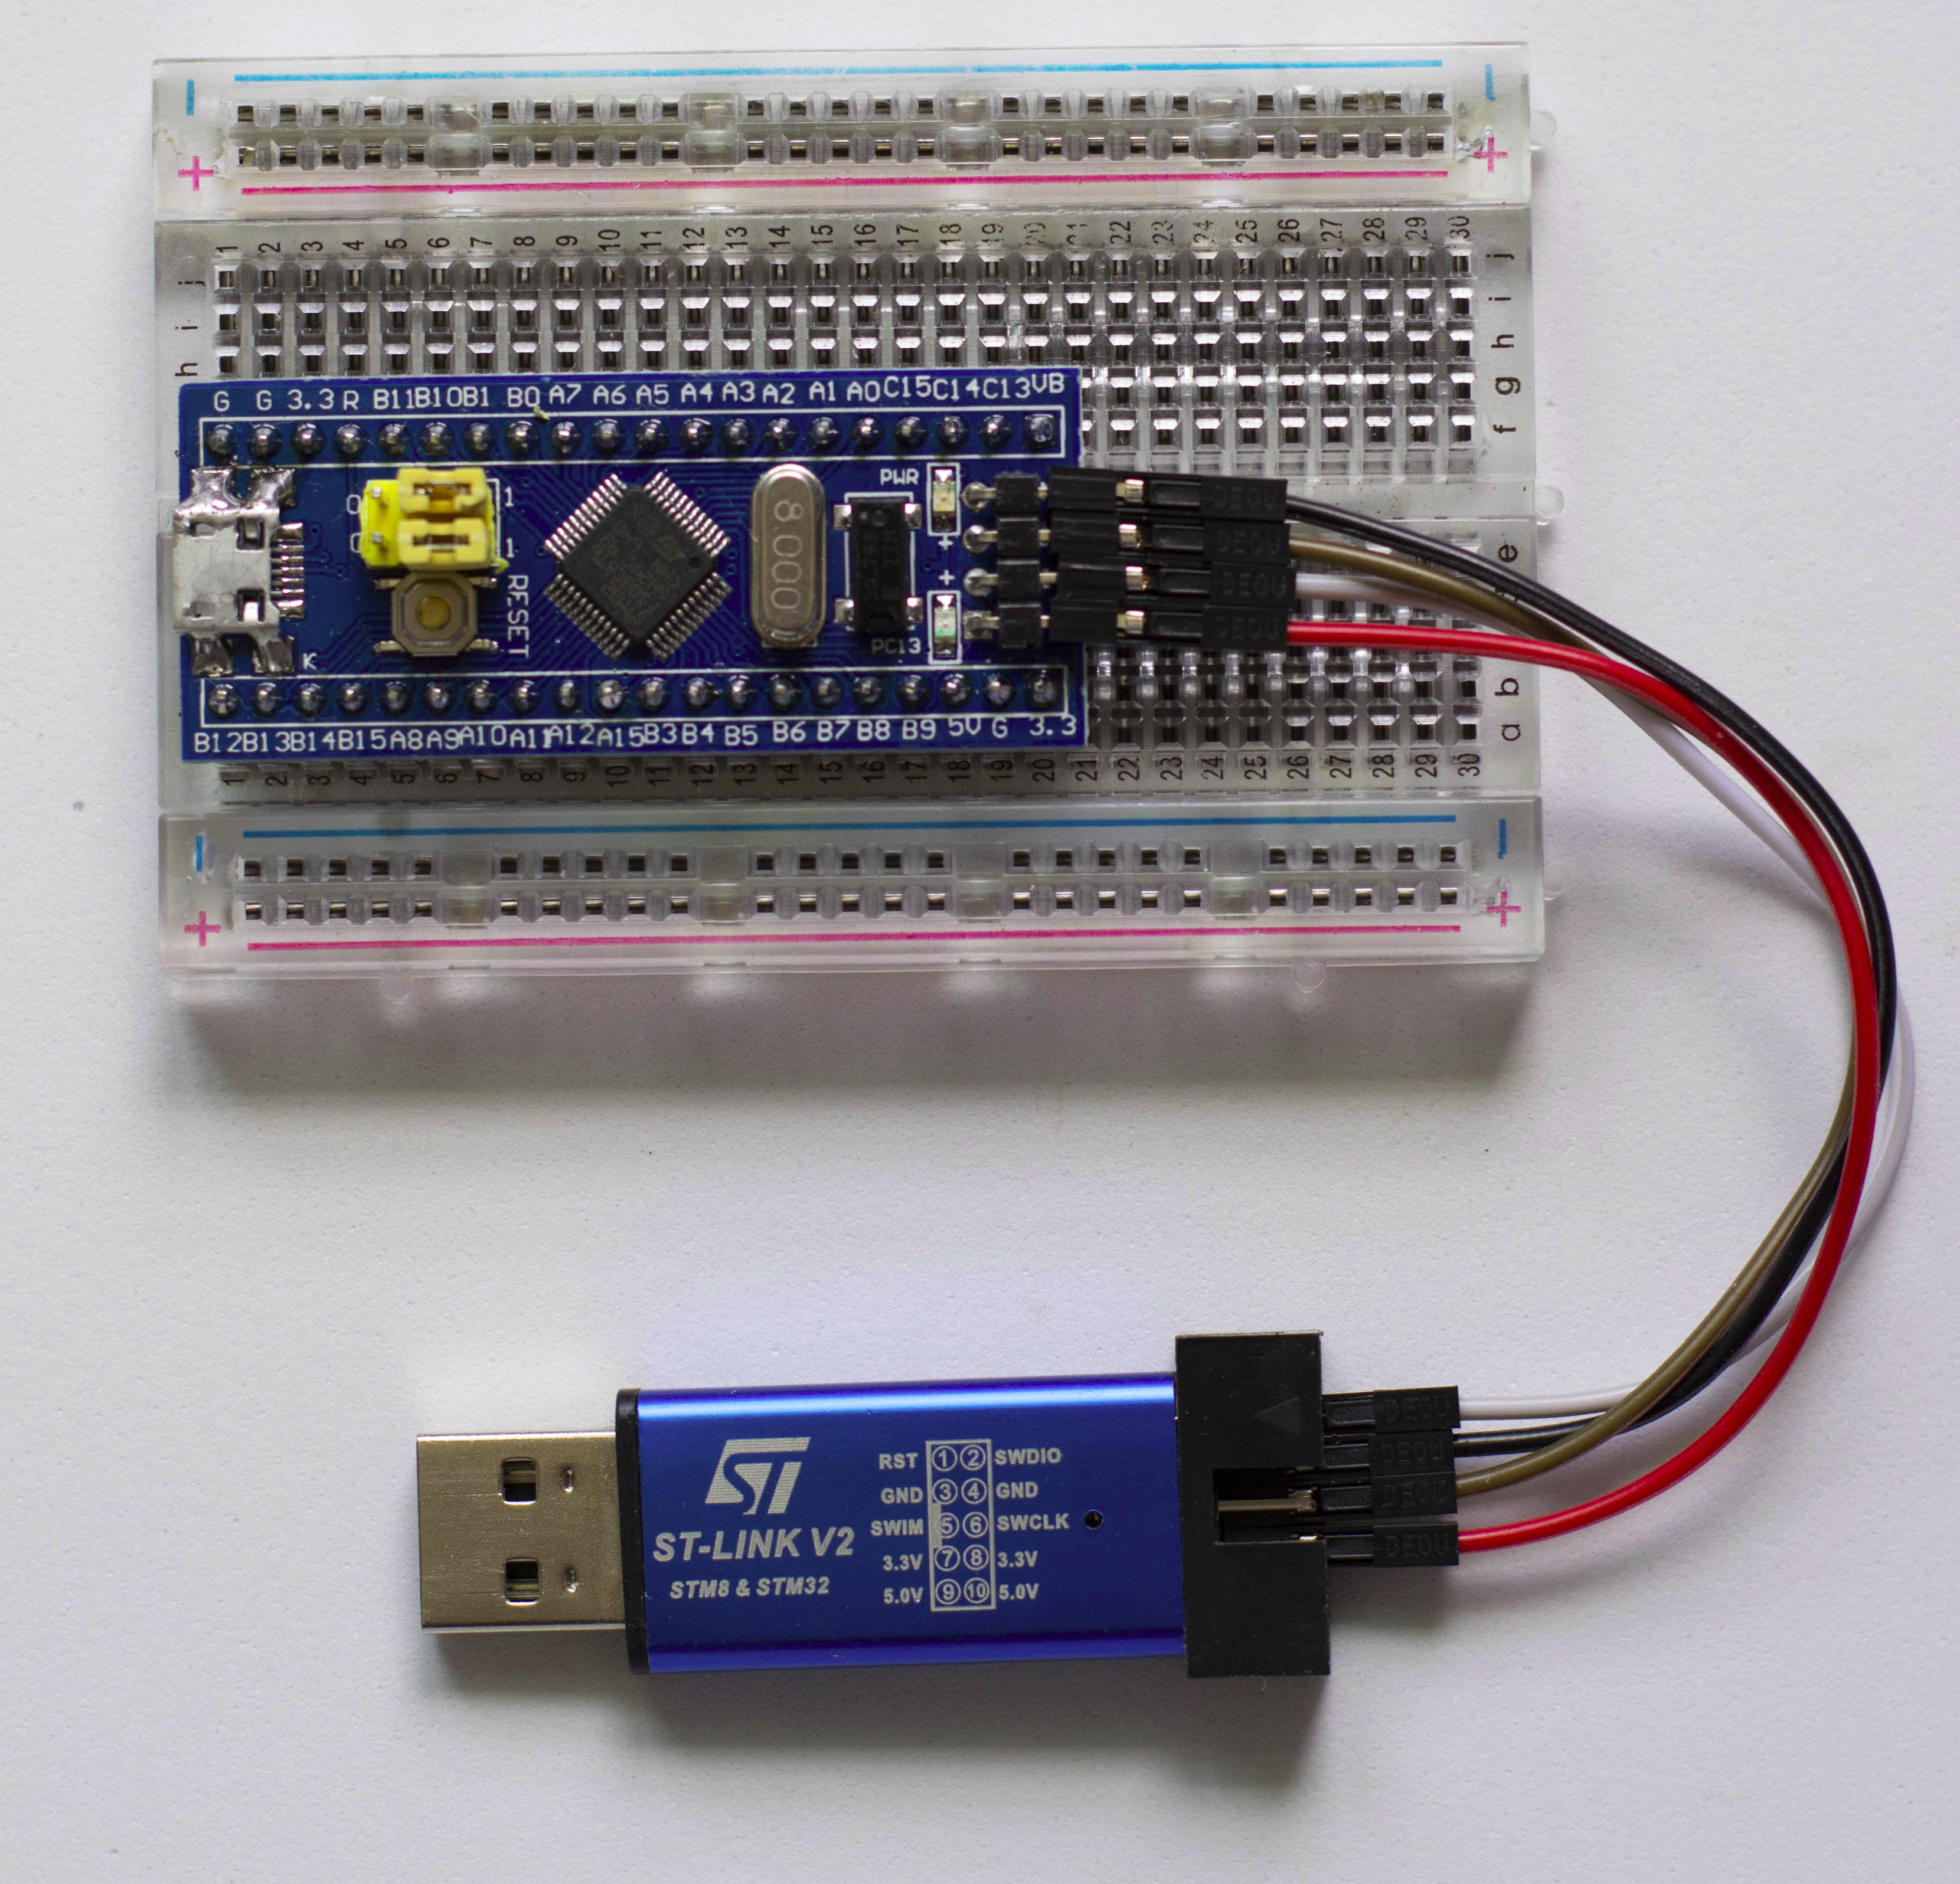
The utility software (listed below) varies as to what interface it uses. To get my STM32F103C8T6 module to work with the utility I need, I used an ST-LINK programmer which attaches to the SWDCLK/SWDIO/PWR/GND pins.
 Here is a list and some information about the software tools (utilities) you will run across when reading articles about programming the STM32F103C8T6. Incidentally, I run a Linux distribution called ‘Fedora‘. If you are running a different Linux distribution, you will need to run your appropriate package installer rather than the one (dnf) Fedora uses.
For installing and compiling some of these utilites, you will need git, cmake and the ‘normal’ set of development tools installed. If you do any development work these tools should already be installed.
Here is the command to install all the needed development (C compiler) tools for the ARM processor:
dnf install arm-none-eabi-binutils-cs arm-none-eabi-gcc-cs arm-none-eabi-gcc-cs-c++ arm-none-eabi-gdb arm-none-eabi-newlib.noarch
Many of the useful utilities are coded in Python and need the Python serial module. Here is how to install it:
dnf install python-pip
pip install pyserial
Here is a list of the utilities:
stm32flash
Open source cross platform flash program for the STM32 ARM microcontrollers using the built-in ST serial bootloader over UART or I2C
stm32loader.py
Python script which talks to the STM32 bootloader (via the serial port) to upload and download firmware.
stlink
Open source version of the STMicroelectronics Stlink Tools
dfu-util
DFU is intended to download and upload firmware to/from devices connected over USB.
OpenOCD
Open On-Chip Debugger
Black Magic Probe
In-application debugging tool for embedded microprocessors.
I eventually installed all of these utilities, however to create a “Black Magic Probe Clone” I really only needed stlink, OpenOCD and the Black Magic Probe software. So, here is how to convert an STM32F103C8T6 into a Black Magic Probe:
I installed OpenOCD via:
dnf install openocd
This step (using OpenOCD to unlock the code protection of the board that will become your new Black Magic Probe) may not be needed but just in case, here it is:
openocd -f interface/stlink-v2.cfg -f target/stm32f1x.cfg -c "init" -c "halt" -c "stm32f1x unlock 0" -c "shutdown"
Next, I installed the stlink utilities globally via:
git clone https://github.com/texane/stlink
cd stlink
make
cd build/Release
make
make install
(make sure /usr/local/lib/ is in some .conf file in /etc/ld.so.conf.d)
ldconfig
Then, to create the Black Magic Probe Software:
git clone --recursive https://github.com/blacksphere/blackmagic.git
cd blackmagic
make
cd src
make clean
make PROBE_HOST=stlink
Make sure you are in the black magic probe src directory. Then erase memory and flash the black magic DFU and software ‘bin’ files via:
st-flash erase
st-flash --flash=0x20000 write blackmagic_dfu.bin 0x8000000
st-flash --flash=0x20000 --reset write blackmagic.bin 0x8002000
Note: Here is where the ‘trickery’ comes in. Using the parameter –flash=0x20000 we can override the reported 64K and specify 128K. Now you can unplug the STLINK programmer and plug in the usb port. You should then see two enumerated ports (probably /dev/ttyACM0 and /dev/ttyACM1).
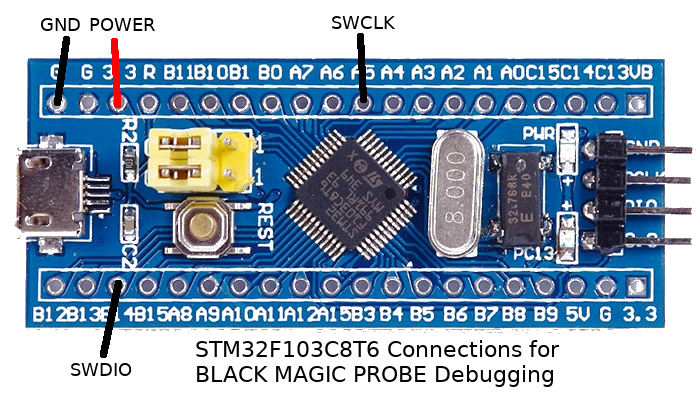
The Black Magic Probe supports both JTAG/SWD and Serial/UART debugging simultaneously. The 1st port (/dev/ttyACM0) is for JTAG/SWD (GDB server) and the second port (/dev/ttyACM1) is a serial UART. Here are the Pin references for the Target and the Debugger (i.e. the Black Magic Probe):
TARGET DEBUGGER
GND     GND
SWDIO   PB14
SWCLK   PA5
POWER   3.3V

TARGET DEBUGGER
RXD     PA3
TXD     PA2
To make it easier, next time I wanted to do this, I created a Python script which runs those needed commands. Additionally, it combines blackmagic_dfu.bin and blackmagic.bin into one bin file called bmp.bin. The script allso runs stlink to dump the memory (after flashing) to compare it with the original to make sure the flash worked ok.
Here is the Python script (it needs to run from the blackmagic probe src directory):
#!/bin/env python

#
# Author: Earl C. Terwilliger II
# Email:  earl@MicroControllerElectronics.com
#

import sys, os, string, re, subprocess

device_re = re.compile("Bus\s+(?P\d+)\s+Device\s+(?P\d+).+ID\s(?P\w+:\w+)\s(?P.+)$", re.I)
df        = subprocess.check_output("lsusb")
stlink    = ""
flash     = "/usr/bin/st-flash"
dfu       = "blackmagic_dfu.bin"
ocd       = 'openocd -f interface/stlink-v2.cfg -f target/stm32f1x.cfg -c "init" -c "halt" -c "stm32f1x unlock 0" -c "shutdown"'

for i in df.split('\n'):
  info = device_re.match(i)
  if info:
    dinfo = info.groupdict()
    if (dinfo['id'] == '0483:3748'): stlink = dinfo['tag']
#   print dinfo

if (stlink == ""):
  print "No ST-LINK found!"
  sys.exit()

print "Found: %s " % stlink

if os.path.isfile(dfu):
  dfus  = os.path.getsize(dfu)
  bsize = (8 * 1024) - dfus
else:
  print "%s not found.\nAre you in the Black Magic Probe src directory?" % (dfu)
  sys.exit()

os.system("dd if=/dev/zero of=blanks bs=1 count=" + str(bsize))
os.system("cat blackmagic_dfu.bin blanks blackmagic.bin >bmp.bin")
os.system("rm blanks")

os.system(ocd)
raw_input("Unplug/re-plug the ST-LINK then...\nPress the ENTER key to continue...")

os.system(flash + " erase")
os.system(flash + " --flash=0x20000 write bmp.bin 0x8000000")

os.system(flash + " --flash=0x20000 read temp.bin 0x8000000 0x20000")
dumps = os.path.getsize("bmp.bin")
os.system("dd if=temp.bin of=dump.bin bs=1 count=" + str(dumps))
os.system("rm temp.bin")
os.system("diff bmp.bin dump.bin")

#os.system("rm bmp.bin")
If you don’t have an STLINK programmer, there is an alternate method to create and flash the bmp.bin file. Create the bmp.bin file with this Python script:
#!/bin/env python
import os
dfus = os.path.getsize("blackmagic_dfu.bin")
bsize = (8 * 1024) - dfus
os.system("dd if=/dev/zero of=blanks bs=1 count=" + str(bsize))
os.system("cat blackmagic_dfu.bin blanks blackmagic.bin >bmp.bin")
os.system("rm blanks")
STM32FLASH can be used with a USB to serial converter to flash the bmp.bin file via the following command:
stm32flash -w bmp.bin -v -g 0x0 /dev/ttyUSB0
Make sure to replace the /dev/ttyUSB0 with your specific port.
To test your new ‘Black Magic Probe clone’, attach it to a target:
 Then run:
arm-none-eabi-gdb -ex "target extended-remote /dev/ttyACM0"
monitor swdp_scan
att 1
Further documentation on GDB (The GNU Project Debugger) can be found HERE.
11 comments
Skip to comment form
Thank you for the write-up, the –flash=0x20000 parameter helped me on a STM32F072 Discovery board.
Author
You’re welcome! If you have not taken a look at the forum at http://www.stm32duino.com/ you might want to take a look. Lots of very knowledgeable people there, and lots of info on STM boards.
What about the power supply measurement? Is there a way to get the correct voltage?
Author
Hi, I am not sure I understand your question and how it applies to the probe. Can you elaborate?
Earl
I so much appreciate your contribution!!! I only wish you were doing this on Debian and and not Fedora. Normally it’s not an issue, but that first string of packages to install (on debian)…
arm-none-eabi-binutils-cs arm-none-eabi-gcc-cs arm-none-eabi-gcc-cs-c++ arm-none-eabi-gdb arm-none-eabi-newlib.noarch
yielded…
E: Unable to locate package arm-none-eabi-binutils-cs
E: Unable to locate package arm-none-eabi-gcc-cs
E: Unable to locate package arm-none-eabi-gcc-cs-c+
E: Couldn’t find any package by regex ‘arm-none-eabi-gcc-cs-c+’
E: Unable to locate package arm-none-eabi-gdb
E: Unable to locate package arm-none-eabi-newlib.noarch
E: Couldn’t find any package by glob ‘arm-none-eabi-newlib.noarch’
E: Couldn’t find any package by regex ‘arm-none-eabi-newlib.noarch’
I guess I have my work cut out for me.
Author
Hi Gary, there are a number of other tutorials on this. You may find one using Ubuntu. The only real thing different (other that me using Fedora) would be that I told the flash utility that my STM32F103C8T6 had 128K. If you haven’t yet seen the forum here:
http://www.stm32duino.com/
you might want to take a look. There is a whole sub-forum for the Black Magic Probe and the STM32F103C8T6. Lots of helpful info there.
Earl
Yes there are a lot of tutorials, many of them are platform specific and like you said, none of them worked for me. A dozen or so anyway. I am using an ODroid XU4 after all. I pick up something new with each one though. I found that most of the packages mentioned here I have already installed, although under Debian, they are named differently, maybe. I did not find the “cs” keyword in any of them and not sure what it represents. So…
arm-none-eabi-binutils-cs (Fedora) may actually be binutils-arm-none-eabi (Debian)
– GNU assembler, linker and binary utilities for ARM Cortex-A/R/M processors
I might be able to get through this Fedora tutorial after all. I found another tutorial that is for Ubuntu however so giving it a go.
For Debian, assuming you have a “generic” build environment installed, you can likely get to the point of building the Black Magic firmware with:
$ sudo apt install gcc-arm-none-eabi
$ sudo apt install openocd
$ sudo apt install stlink-tools
(Thanks for sharing your experiences. Will work through why the st-flash commands are appearing to work, but failing with -1 when using a pair of ST-LINK V2 clones for the process.)
I don’t have stlink tool, but juse J-Flash instead
I change target to 103CB, its flash size to 128K as they share same silicon design.
then i merge bin image (blackmagic_dfu_swlink.bin + blackmagic_swlink.bin), which from Gitbub
i can program successfully.
But after that, i cant find any USB device port appear , anything i missing ?
Appreciate your helps.
Author
Are you flashing an STM32F103CB or STM32F103C8? The hardware makes a difference.. This post is for an STM32F103C8T6. Some of the STM32F103C8T6 ‘blue pills’ have the wrong resistor for the usb and that creates problems.
Read more on it here: STM32f103c8t6 usb resistor
Author
It might be easier to just download the GNU ARM Embedded Toolchain from here:
https://developer.arm.com/tools-and-software/open-source-software/developer-tools/gnu-toolchain/gnu-rm/downloads
which will give the arm-none-eabi-gdb binary instead of installing from a linux distribution repo (especially since recent versions of Fedora no longer have the arm-none-eabi-gdb rpm).