
I like experimenting with wireless devices, as you can tell from the many posts about them here! 😎 I am trying out an FS1000A Wireless RF433 Transmit and Receive Module pair this time.
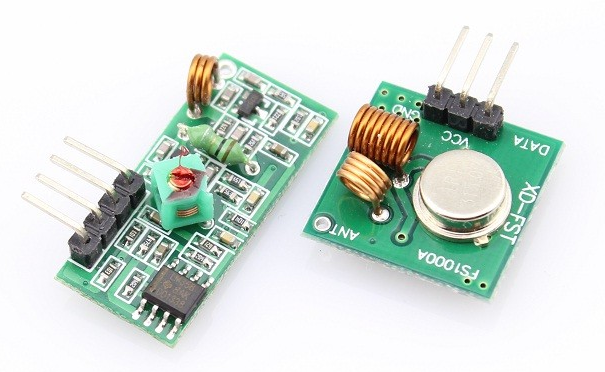
They use use the RF 433Mhz frequency with ASK modulation. (You can also get these with the 315Mz frequency instead.) I got mine from Elecrow.com. They look like this:
FS1000A Wireless RF433 Transmit and Receive Module Pair
 Here is a graphic on how they work together:
 Basically you can use one Arduino to control the Transmitter and one Arduino to control the Receiver. An Arduino RF library comes in handy for that. In the past, you’d use the VirtualWire library for controlling these modules, now however, there is a better library called RadioHead which supersedes it. Download it from HERE. Once you install it from the Arduino IDE (Sketch -> Include Library -> Add .ZIP Library) there will be a number of examples to choose from. You can use the File -> Examples -> RadioHead -> Ask -> ask_receiver and ask_transmitter sketches.
I modified them a bit as shown below.
Here is the sketch for the Arduino Receiver:
#include <RH_ASK.h>
#include <SPI.h>

// Arduino                     Receiver
//  GND--------------------------GND
//  D11--------------------------Data
//  5V---------------------------VCC

RH_ASK driver(2000, 11, 12);

void setup() {
  Serial.begin(9600);
  if (!driver.init()) Serial.println("init failed");
}

void loop() {
  uint8_t buf[RH_ASK_MAX_MESSAGE_LEN];
  uint8_t buflen = sizeof(buf);

  if (driver.recv(buf, &buflen)) {
    driver.printBuffer("Received:", buf, buflen);
  }
}
Here is the sketch for the Arduino Transmitter:
#include <RH_ASK.h>
#include <SPI.h>

// Arduino                     Transmitter
//  GND--------------------------GND
//  D12--------------------------Data
//  5V---------------------------VCC

RH_ASK driver(2000, 11, 12);

void setup() {
  Serial.begin(9600);
  if (!driver.init()) Serial.println("init failed");
}

void loop() {
  const char *msg = "hello";
  driver.send((uint8_t *)msg, strlen(msg));
  driver.waitPacketSent();
  delay(200);
}
As you can tell from the comments in the code, they are very easy to hook up. Both use only three pins (VCC, GND and DATA). Here is the Fritzing Diagram showing how they are connected:
 You can download the custom fritzing parts from here. If you want my fritzing diagram, download it from here.
Updated Note (6/21/2018): In the receiver code, the printBuffer function ‘dumps’ the buffer in HEX (probably for better diagnostics). Here is the code for the receiver, if you want a normal print of the received characters:
#include <RH_ASK.h>
#include <SPI.h>

// Arduino                     Receiver
//  GND--------------------------GND
//  D11--------------------------Data
//  5V---------------------------VCC

RH_ASK driver(2000, 11, 12);

void setup() {
  Serial.begin(9600);
  if (!driver.init()) Serial.println("init failed");
}

void loop() {
  uint8_t buf[RH_ASK_MAX_MESSAGE_LEN];
  uint8_t buflen = sizeof(buf);
  uint8_t i;
  if (driver.recv(buf, &buflen)) {
//    driver.printBuffer("Received:", buf, buflen);
    Serial.print("Received:");
    for (i = 0; i < buflen; i++) Serial.print(buf[i]);
    Serial.println("");
  }
}
9 comments
Skip to comment form
si se pueden cambiar los pines que usted esta utilizando (11,12) por otros.
Author
Yes, you can change the pins. The documentation for the RH_ASK is here http://www.airspayce.com/mikem/arduino/RadioHead/classRH__ASK.html.
11 is the default receive pin and 12 is the default transmit pin.
how i can programmer two buttons whit fs1000a?
Author
Hi! There is plenty of code around for controlling ‘buttons’ with an arduino. For example: https://www.arduino.cc/en/Tutorial/Button
(Note: It would be the arduino connected to the button or buttons, not the FS1000A.)
Thanks, but I am not receiving the word “Hello”….I think those are hexadecimal. Please assist.
Author
It is not hexadecimal.. If everything is set up properly you should see “Received: Hello” on the serial console for the Arduino Receiver.
Perhaps the RH library has been updated since you published? I too am getting a hex dump of hello 68 65 6C 6C 6F, rather than characters. I copy/pasted your code. The only thing changed is the driver definition as I’m using different pins.
From the RH documentation, printBuffer() “Prints a data buffer in HEX. For diagnostic use”
Author
Thanks! You guys are correct, the printBuffer() function does print in HEX. I added a note in the post on changing that if you want to.