
How to Power an LED (Arduino vs. Pinguino) might seem silly, however, if you take a look at the following graphic, you will hopefully notice something interesting. The Pinguino sources the power to the ‘user’ LED differently that does an Arduino. The Pinguino wiring is represented by the green LED and the Arduino wiring is represented by the red LED.
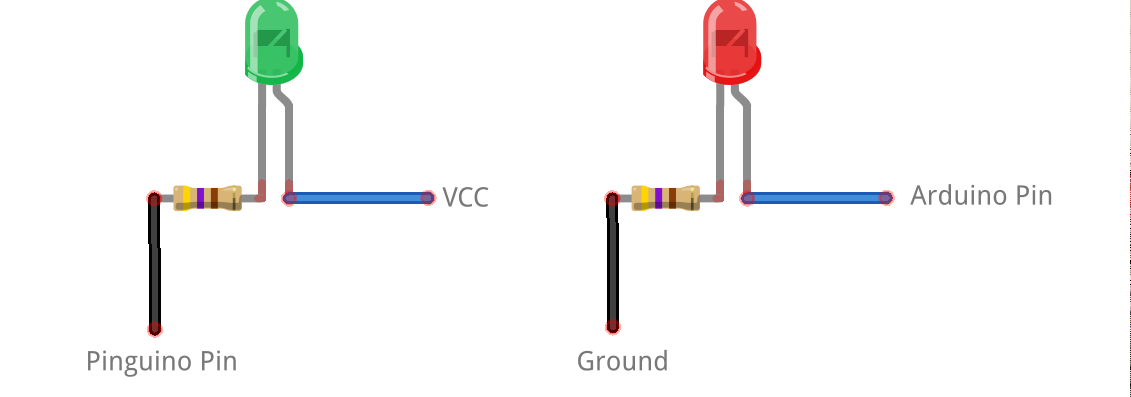
How to Power an LED (Arduino vs. Pinguino)
The Arduino powers the LED via a Pin connection versus the Pinguino which sources power to the LED from VCC. So when you write your code to turn on/off the LED notice also the differences. To turn on the Pinguino user LED the Pin is brought LOW via digitalWrite(USERLED,LOW) and turned off via digitalWrite(USERLED,HIGH). Notice this is the opposite to the Arduino code. To turn on the Arduino user LED (on Pin 13 usually) the Pin is brought HIGH via digitalWrite(13,HIGH) and turned off via digitalWrite(13,LOW).
The Pinguino IDE has a ‘built-in’ variable USERLED which references the pin for the user LED on the target Pinguino board. The Pinguino IDE also has a ‘built-in’ toggle() function:
toggle(USERLED);
to do basically the same as:
digitalWrite(USERLED, !digitalRead(USERLED));
If you code and run the standard ‘blink’ sketch or just toggle() you might not notice or care about the difference in wiring, as the LED blinks (regardless of whether it was on or off initially).
Recent Comments