There is a new kid on the block, the NL6621-Y1 Wireless Module from Nufront. The NL6621 WiFi SOC is powered by a 160 MHz ARM Cortex-M3 (NL6621M). Everything is integrated in the NL6621M SOC including 448KB of RAM.
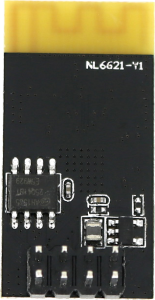
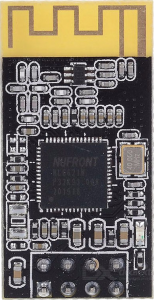
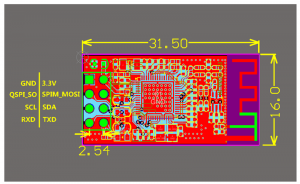
Here is what the NL6621-Y1 wireless module looks like:
Supposedly it is much better than the ESP8266 from Expressif. However, the ESP8266 has a lot of code and documentation for it whereas there is very little information or code for the NL6621-Y1 wireless module (as of this post).
Nufront does have several GitHub repositories for it here:
The common module (NL6621-Y1) seems to have the NL6621_SerialNet_SDK installed as that is what services the serial AT command set which allows the module to be configured via a serial interface.
I have the NL6621-Y1 wireless module from Elecrow and I wanted to see if I could get it working (attached to an Arduino Leonardo) similar to how I attached an ESP8266 in an earlier post.
Hooking it up, hardware wise, is a breeze. Attach the NL6621-Y1 3.3V pin to the Arduino 3.3V pin, GND to GND, NL6621-Y1 TXD to Arduino RXD and NL6621-Y1 RXD to Arduino TXD.
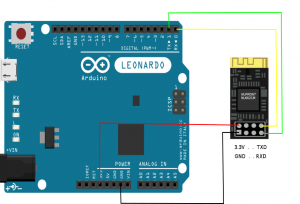
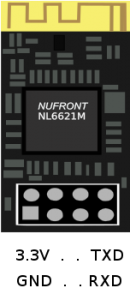 At first, I used the multiserial mega Arduino script (HERE) to experiment with the AT commands. That script basically takes characters you type in the serial console and sends them to the 2nd serial port and it echos any data coming from the 2nd serial port to the 1st. I set both serial port BAUD rates to 115200. Sending “AT+HELP” will list all the supported AT commands.
Searching GOOGLE I could not find any information on the AT command set so I took a look at the SerialNet SDK source. Here is a chart showing what I gleaned from that code:
NL6621-Y1 Wireless Module AT commands
AT 		TEST AT COMMAND
		AT

AT+HELP 	HELP
		AT+HELP

AT+VER 		AT commands version check
		AT+VER

AT+SVER 	SDK version
		AT+SVER

AT+SAVE 	SAVE CONFIGURATION
		AT+SAVE

AT+FACTORY 	RESTORE FACTORY SETTINGS
		AT+FACTORY

AT+RST 		RESET
		AT+RST

AT+SYSTIME	SYSTEM TIME
		AT+SYSTIME

AT+BAUDRATE 	CHECK/SET BAUD RATE
		AT+BAUDRATE=?
		AT+BAUDRATE=baudrate (300 - 1250000)

AT+UARTFT 	CHECK/SET UART AUTO FRAME INTERVAL TIME
		AT+UARTFT=?
		AT+UARTFT=time  (30-10000) ms

AT+UARTFL 	CHECK/SET UART FRAME LENGTH
		AT+UARTFL=?
		AT+UARTFL=length (32-1400) bytes

AT+MSLP 	CHECK POWER SLEEP MODE
		AT+MSLP

AT+LSLPT 	SET SHALLOW SLEEP WAKEUP TIME AND MODE
		AT+LSLPT=mode,time,dtim

AT+IPCONFIG 	CHECK CURRENT IP ADDRESS
		AT+IPCONFIG

AT+PING 	PING SPECIFIC IP ADDRESS
		AT+PING=address,count

AT+MAC 		CHECK MAC ADDRESS
		AT+MAC

AT+WQSOPT 	CHECK/SET WIFI PARAMETERS
		AT+WQSOPT=?
		AT+WQSOPT=mode,channel,encry,authmode,WmmEn
		mode		0:STA 1:ADHOC 2:SOFTAP
		channel	        1-13
		encry		0:none 1:wep 2:tkip
                                3:ccmp 4:auto
		authmode	0:open 1:share 2:wpa 3:wpa2
		WmmEn (wifi)	0:disable 1:enable
                               (multimedia extensions)

AT+WPHYMODE 	CHECK/SET PHYSICAL LAYER WORK MODE
		AT+WPHYMODE=?
		AT+WPHYMODE=mode  (1: b/g 2: b)

AT+WTXRATE 	CHECK/SET TRANSMIT SPEED
		AT+WTXRATE=?
		AT+WTXRATE=rate  (0,1,2,5.5,6,9,12,18,24,36,48,54)

AT+WSCANAP 	SCAN NEAR BY AP INFO
		AT+WSCANAP=rssiFilter (0-127)

AT+WSBCN 	CHECK/SET BEACON SET CYCLE
		AT+WSBCN=?
		AT+WSBCN=period

AT+WSCAP 	CHECK CURRENT AP/ SET AP TO CONNECT
		AT+WSCAP=?
		AT+WSCAP=ssid,password,trytimes

AT+WSMTCONF 	ENTER INTO DIRECT CONFIG MODE
		AT+WSMTCONF

AT+WSTOP 	CLOSE CURRENT WIFI FUNCTION
		AT+WSTOP

AT+NQSCNN 	CHECK/SET TRANSPARENT TRANSMISSION PARAMETERS
		AT+NQSCNN=?
		AT+NQSCNN=protocol,type,port,ip
                     (protocol: 0=udp 1=tcp
                      type: 0=client 1=server)

AT+NLOCIP	CHECK/SET IP ADDRESS and DHCP enable/disable
		AT+NLOCIP=?
		AT+NLOCIP=ip,mode,trytimes
                 (mode: 0=DHCP disable 1=DHCP enable)

AT+WSACONF      SOFTWARE AP Config
		AT+WSACONF

AT+AIRKISS      AirKiss Configuration
		AT+AIRKISS

AT+BCTTXSTART   UDP Broadcast Switch Start on Port
		AT+BCTTXSTART=port  (1 to 65535)

AT+BCTTXSTOP    UDP Broadcast Stop
		AT+BCTTXSTOP

AT+BCTTXDATA    UDP Broadcast Data
		AT+BCTTXDATA=length,data

AT+BCTRXSTART   UDP Broadcast Receive
		AT+BCTRXSTART=port

AT+BCTRXSTOP    UDP Broadcaset Receive Stop
		AT+BCTRXSTOP

AT+QUIT 	QUIT (quits command mode)
                DATAMODE: Runs TCP Server on port 8101
                +++ exits back to CMDMODE
Example: Enter DataMODE
============================================================
AT+QUIT
(then telnet to the IP address of the NL6621 on port 8101)
+++ (exits back to CMD Mode)
Example: Scan for Wireless APs
============================================================
AT+WSCANAP=127
Example: Set NL6621-Y1 to be an AP
============================================================
AT+WQSOPT=2,11,3,3,0 //SOFTAP,11,ccmp,wpa2,disable
AT+WSCAP=nufront,123abcdef,0 //SSID,password,retries
AT+IPCONFIG //Show IP configuration
Example: Set NL6621-Y1 to STATION mode and connect to an AP
============================================================
AT+WQSOPT=0,11,3,3,0 //Station,11,ccmp,wpa2,disable
AT+WSCAP=your_ap_ssid,yourpassword,5 //SSID,Password,retries
AT+IPCONFIG //Show IP configuration
Here is an Arduino sketch which sets the wireless options and connects the NL6621-Y1 wireless module to my TP-Link router. Note: If you use this code make sure to change the SSID and PASS variables to match your router!
The NL6621-Y1 Wireless Module Arduino Sketch
/*
Arduino Leonardo <--> NL6621-Y1
Email:  earl@microcontrollerelectonics.com
*/

#define SSID "TP-LINK_2.4GHz_4463DB"
#define PASS "44620"
#define CONNECT_ATTEMPTS 2

void setup() {

  Serial.begin(115200);
  Serial1.begin(115200);

  Serial1.println("AT+RST");
  delay(3000);

  Serial1.println("AT");
  delay(1000);

  if (Serial1.find("+OK")) Serial.println("Module is ready");
  else {
    Serial.println("NL6621 Module did not respond.");
    Serial.println("Enter Commands Manually.");
    while (1) chk_serial_io();
  }

  boolean connected = false;
  for (int i = 0; i < CONNECT_ATTEMPTS; i++) {
    if (connectWiFi()) {
      connected = true;
      break;
    }
  }
  if (!connected) Serial.println("Enter Commands Manually.");
  else {
    Serial.println("AT+IPCONFIG");
    Serial1.println("AT+IPCONFIG");
  }
}

void loop() {
  while (1) chk_serial_io();
}

void chk_serial_io() {
  while(Serial1.available()) {
    int inByte = Serial1.read();
    Serial.write(inByte);
  }
  while(Serial.available()) {
    int inByte = Serial.read();
    Serial1.write(inByte);
  }
}

boolean connectWiFi() {
  String cmd = "AT+WQSOPT=0,11,3,3,0";
  Serial.println(cmd);
  Serial1.println(cmd);

  if (Serial1.find("+OK")) {
    Serial.println("Station Mode Set OK!");
  }
  else {
    chk_serial_io();
    return false;
  }

  cmd = "AT+WSCAP=";
  cmd += SSID;
  cmd += ",";
  cmd += PASS;
  cmd += ",";
  cmd += CONNECT_ATTEMPTS;
  Serial.println(cmd);
  Serial1.println(cmd);

  return true;
}
One thing I don’t like about the NL6621-Y1 is that it does not have a unique (i.e. official) MAC address. When you send this: AT+MAC the result is +OK=MAC:00:01:02:03:04:05.
Anyway, it will be interesting to see what the open source community comes up with to do with this new wireless chip.

7 comments
Skip to comment form
Thanks for your work on this which I found useful.
I successfully set one up and set it for UDP broadcast and that worked fine. However, I found a major problem (I want to use it to broadcast NMEA data on a boat). The command to send data, which has the format “length,data” works but NOT if there is a comma in the data string. I have tried everything but there does not seem to be an escape character. If you have a comma, it returns an error. Probably because it parses the string and does not distinguish a comma in the data. So probably a real bug.
Have you any thoughts on a workaround? There will always be commas in my strings and it makes the unit rather useless if I cannot solve it.
Best Regards,
Dave
Author
Hi David,
Sorry, no thoughts. I was sort of disappointed with this module. There has not been any activity by the vendor for a while. The SDK source is available if you want to modify it but that is not so easy to get it working. Also, the community following this module has not happened like it has for the ESP8266. Earl
This isn’t a bug, but the correct and intended behavior for serial devices that use the Hayes style command mode (AT+).
Why are you trying to send data (be it NMEA or anything else) in command mode? That is what DATA mode is for. For sending data to the thing on the other end. COMMAND mode is not. It is for issuing commands to the modem (which this device is pretending to be), not to transmit data.
Honestly, the BCTTXDATA command shouldn’t even be there – it doesn’t need to be and it’s inclusion would seem to promote the incorrect usage of itself. I don’t know why they even have it, perhaps for debugging?
Still, I don’t really understand why you’re using it instead of just doing the normal thing:
1. In command mode, once everything is connected, issue the BCTTXSTART command to open a UDP socket on the port of your choice.
2. Quit command mode (since this mode is strictly for issuing commands to the modem) with the QUIT command, returning you to the default data mode.
3. Just pipe the NMEA directly to the serial port connected to this WiFi device. It will be transmitted over the UDP socket you picked and, assuming you have something listening on that socket, it will receive it.
4. If you want to switch back to tcp using the relent server, invoke command mode from data mode with +++ and a carriage return, issue BCTTXSTOP.
Note how none of that involved using the totally unnecessary BCTTXSEND command.
Please don’t assume it’s a bug just because you don’t understand how basic serial communications work. There is no bug in the SDK in relation to this that can or should be fixed.
This is in no way unique to this device. Anything that is emulating a modem using AT commands and having a command and data mode would behave (and be used) this way.
Hi.
How to connect to the network?
Thanks.
Author
Hello!
In the post I show the commands to connecct the NL6621 to an access point (wireless router) and a script to automate it. Can you be more specific on what you need?
Earl
I tried to use it with arduino nano but after uploading some sketch the module LED turned off and only it blink once when connected to the power.I tried to flash its firmware using Esp8266 flash software and then Nufront flash tool usin some chinese unknown files but nothing happend or maybe the module corrupted. So how can I repair it?? How can test it with arduino?? Is there any software and boot loader file which I use to mend it?!
Author
Hi,
Download the SDK here: https://github.com/NufrontIOT/NL6621_SerialNet_SDK
and take a look at the tool folder. You can find the flash tool and the bin file to flash.
Earl