PCDuino Lite – An Arduino with more Power and Flexibility!

For certain Arduino like projects, you might need more CPU power or the flexibility of running Linux ‘on board’. Besides the Arduino Galileo you might consider another device outside the Arduino family, something like the PCDuino from LinkSprite.

I recently experimented with a PCDuino Lite which has 512 MB DRAM, a 1GHz ARM Cortex A8 CPU and a Mali 400 core GPU. It also has HDMI video out, a RJ45 Ethernet connector, two USB ports  and a microSD card slot for loading Linux (Ubuntu 12.04). There are also two microUSB ports (one is OTG and the other is just for power).  It looks like this:

PCDuino Lite Top View

PCDuino Lite Back View

You can access the following interfaces,  UART, ADC, PWM, GPIO, I2C, SPI with programs written in C or Python. Here is a graphic of the pins:

PCDuino Lite Pins

I had several problems once I 1st got Ubuntu (Linux) up and running. Those problems and solutions are well documented here. Additionally I had to use a Class 10 (UH1) microSD card as any lesser class would not boot.  To get access to the GPIO pins, I had to run:

sudo modprobe gpio

to load the GPIO module. This creates the files associated with the pin and the pin mode. Sparkfun.com has a good tutorial on getting started with the PCDuino and one on programming it.

Automated AP-List Scanner for the ESP8266

I recently posted about using the nRF24L01 module to scan for channels in the 2.4GHz range. That will let you know what channels are in use, however, since the nRF24L01 does not have the embedded network stack, we can’t determine other things like what the ESP8266 module can. (Have you checked out the Espressif.com ESP8266 forum? There is a wealth of information there.)

If you are interested in seeing what Access Points are ‘invading’ your space, here is a sketch to list them (runs every 10 seconds):

It is basically a modified version of the MultiserialMega sketch in Examples->Communication. Note: It only works on Arduinos with multiple serial ports (like the Mega or Leonardo). Also, the ESP8266 has to be in AP (Access Point)  mode for this to work (i.e. you may need to uncomment the line which has the “AT+CWMODE=3” command). The wiring for the Arduino <==> ESP8266 is the same as I document in this post.


Using an nRF24L01 Module to Scan the 2.4GHz Frequency Range

There is a lot of electrical ‘noise’ all around us that we can’t see or sense as humans. However, in this day and time we have a great number of electronic devices which can sense what we can’t. Actually, it is these vary same electronic devices in most cases which are the cause of all the ‘noise’.  😯

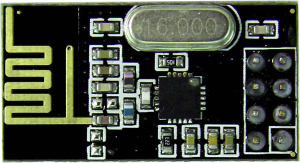
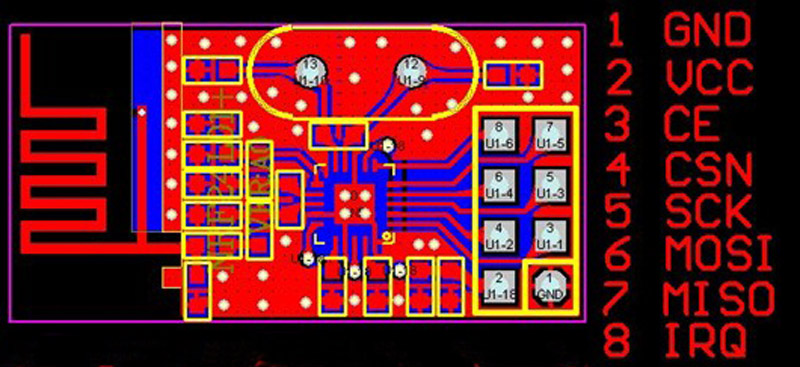
For example, if you are interested in seeing what frequencies are in the 2.4GHz range (to determine what channel might be best for your WiFi router), you will be interested in the nRF24L01 module from Nordic Semiconductor.  Here is a link to the product specifications.  They look like this:

nRF24L01nRF24L01 Pinout


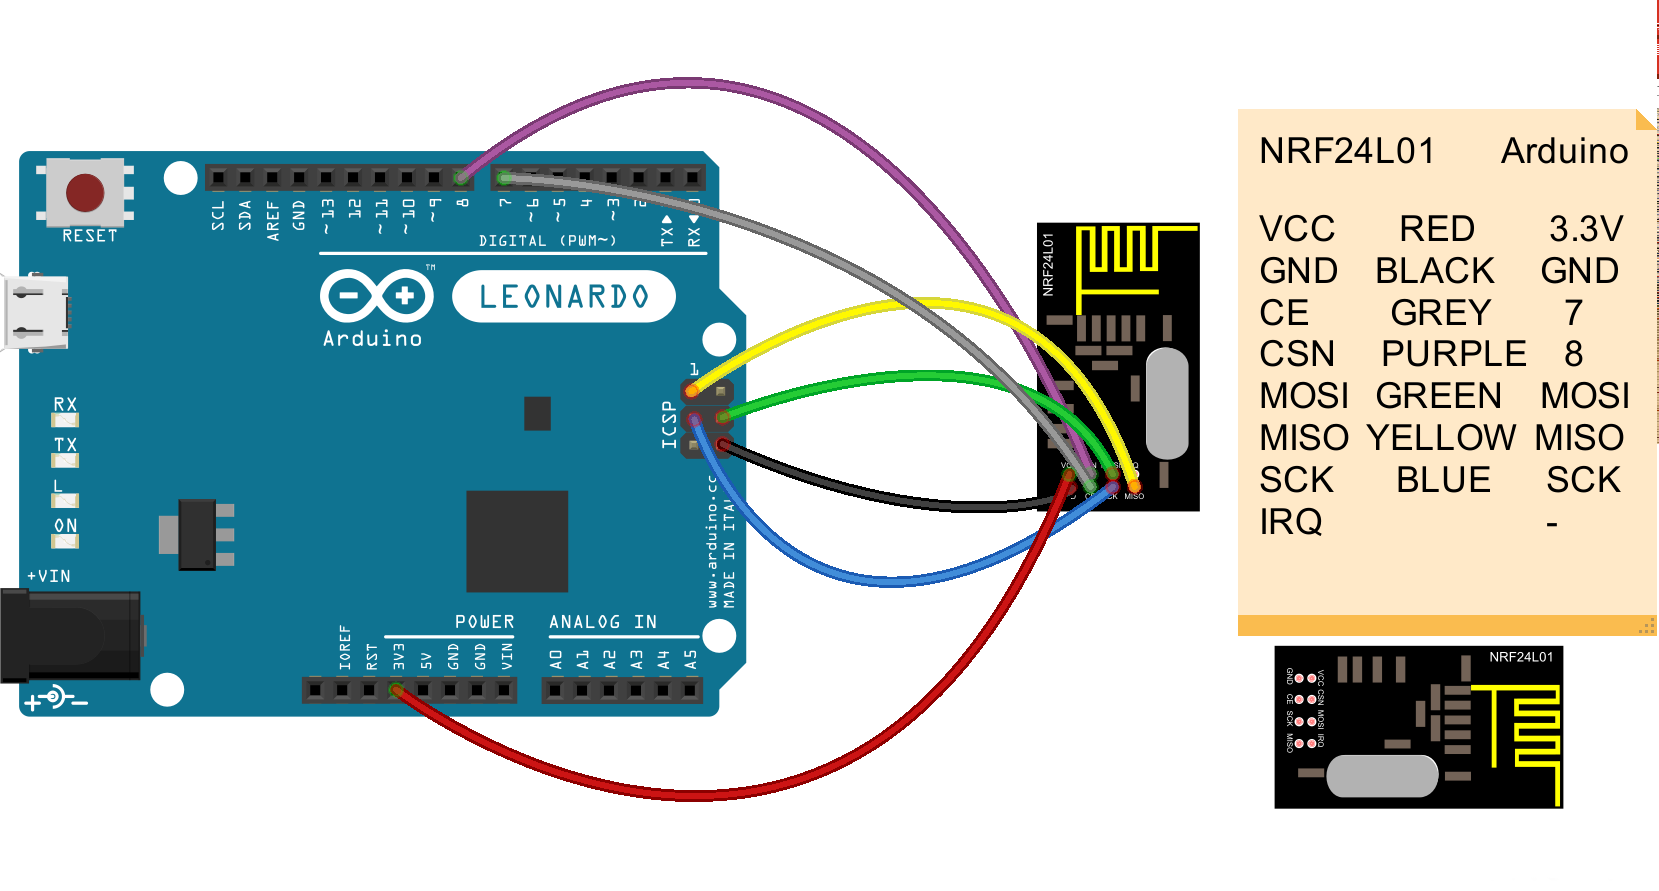
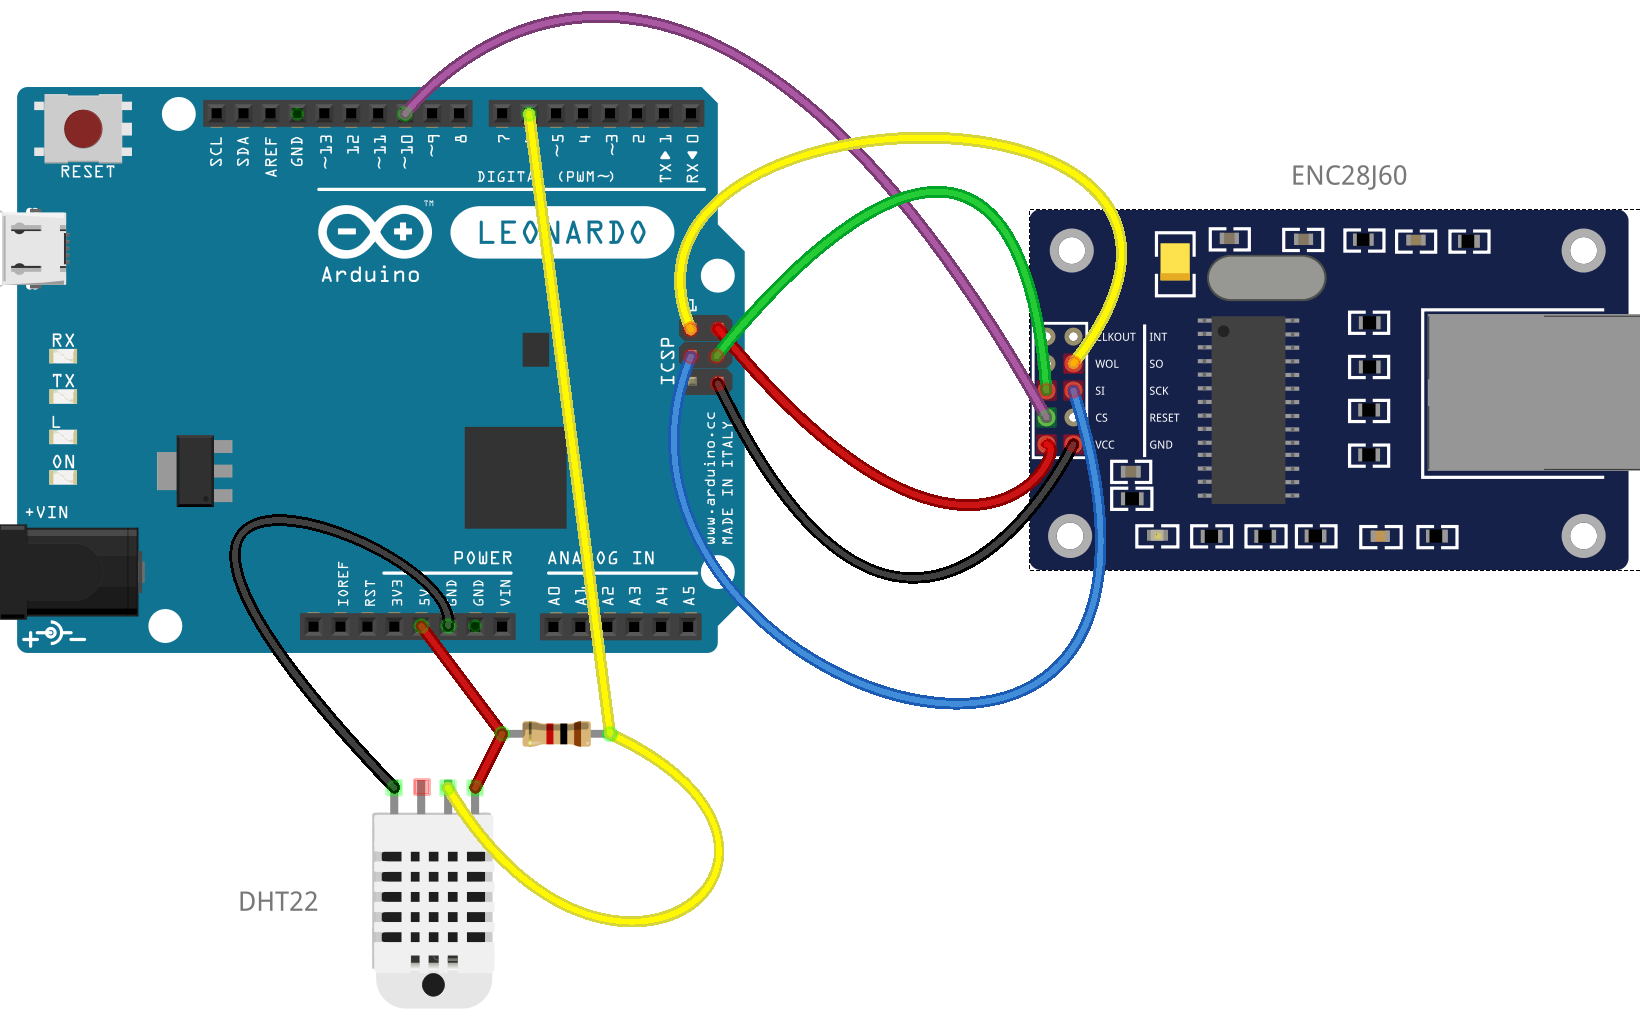
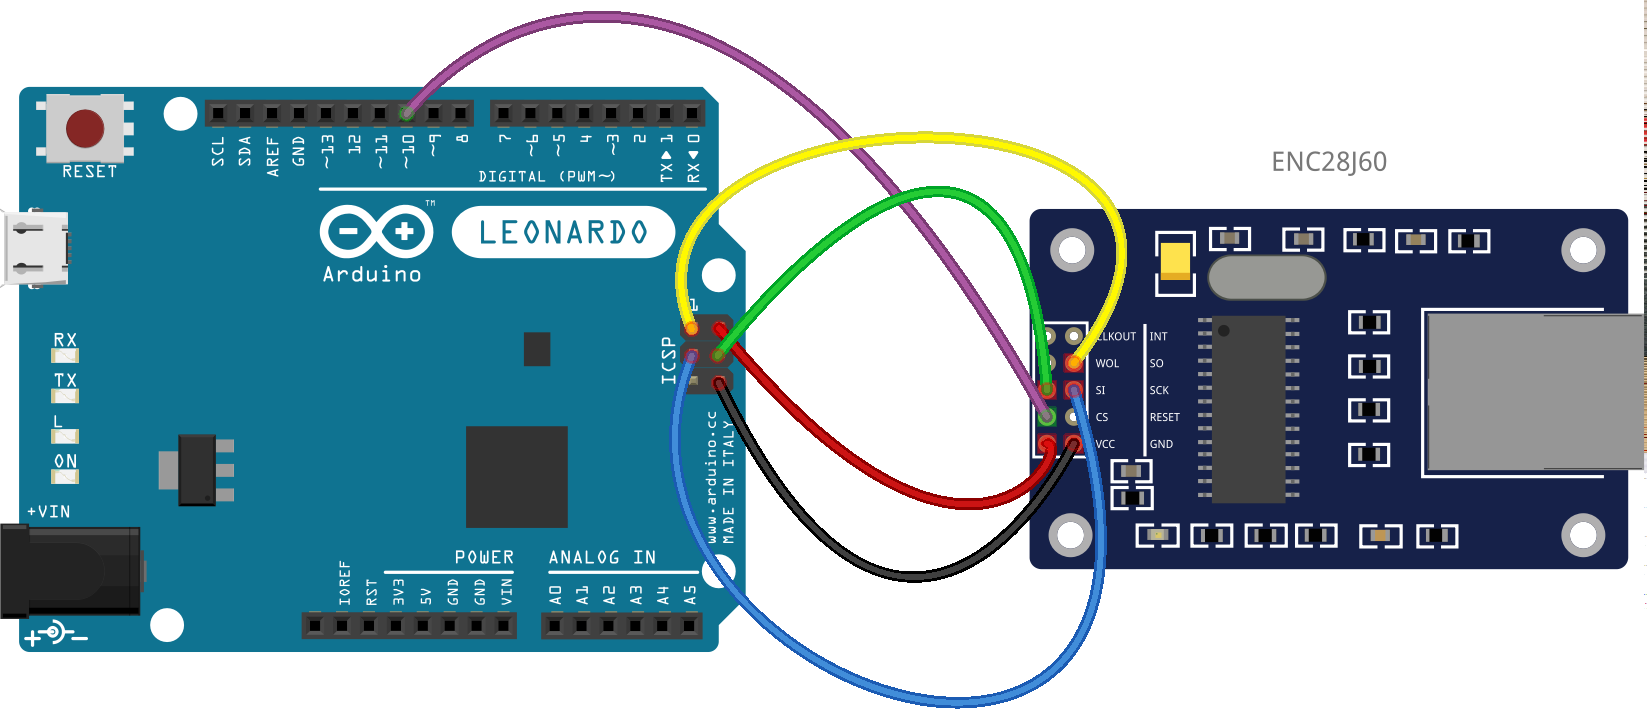
Here is the Fritzing diagram to wire it up to an Arduino Leonardo:

nRF24L01 Wiring Diagram

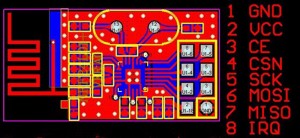
If you want to modify the Fritzing diagram, here is the source. This module uses the SPI interface to communicate. Notice that the two ‘radio’ pins in my diagram (CE – Chip Enable  and CSN – Chip Select) are wired to Arduino pins 7 and 8 respectively (this must match what the code is expecting them to be which varies depending upon the library you choose). Also, you may need to place a 10 uf capacitor between +3.3v and ground to stabilize the power supply. These modules use 3.3V not 5V!

You will need an Arduino Library to control the nRF24L01 module, I used the one here. That library has a number of example sketches. The one to use (listed below called scanner.ino) wiil use the nRF24L01 module to scan the 2.4GHz frequency range. Note: I modified the code to use variables for the CE and CSN pins to make it easier to change if needed.


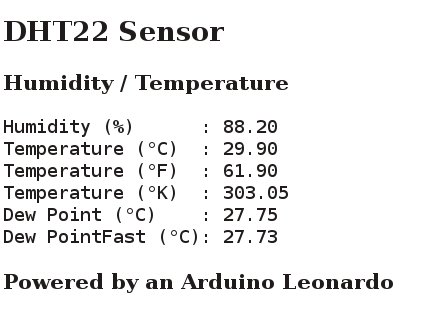
Here is what the output looks like (basically a list of all the available channels/frequencies then a list of what the nRF24L01 found at each frequency):

For your further investigation, there are of course, a number of sites on the internet with information about the nRF24L01 module and I find this one http://arduino-info.wikispaces.com particularly interesting and helpful.

Affiliate Disclaimer

Microcontroller Electronics Logo

MicroControllerElectronics.com does not participant in any commercial advertising program.

Arduino Galileo

I have been experimenting lately with the Arduino Galileo from Intel. It is not a new Arduino board as it was introduced back in October of 2013. This Arduino has an Intel Quark single-core 32 nm X1000 SoC with a clock rate of up to 400 MHz.  It has several interfaces, including PCIe, UART, I2C, Fast Ethernet, USB 2.0, SDIO, PMC, and GPIO. There is 512K of on-chip embedded SRAM and an integrated DDR3 memory controller. Intel has lots of information about it here. Download the official users guide or the excellent getting started guide from Sparkfun.com.  The Intel Galileo community forum is an excellent source of information too and also a place to get your questions answered.


Arduino Galileo

ARDUINO GALILEO

What makes this Arduino so interesting is that it runs a version of Linux (my favorite OS of choice) called Yocto.  You can get the download image to install on an SD card here.

Once installed you can control this Arduino through Linux (accessing it via SSH)  or via the traditional Arduino IDE. I found Sergey’s log post quite helpful to control the GPIO pins from Linux. You can find a good pin mapping chart here.

This Arduino is more expensive than other Arduinos but has more horsepower under the hood and with the added advantage of Yocto Linux running services such as Node.js and Mosquitto, there are more possibilities for expressing your creativity.

A Python script to run the Arduino MiniPirate Sketch

A while back I wrote about the BusPirate. You can view that post here. In it, I mention an Arduino sketch called the “MiniPirate” which allows you  to try some of the functions of the BusPirate on an Arduino.

Over time, I have found that sketch to be very useful. You can use it to test/debug and prototype different electronic components. Even more than that, it is fun and an easy way to engage students to interact with the world around them.

Always have an Arduino around with the sketch loaded in so it will be as handy as the BusPirate. Then just plug it into your PC USB port and you are ready to go. No need to load up the Arduino IDE as I have a handy Python script (shown below) to interact with the sketch.

A Linux Python script to run the Arduino MiniPirate Sketch:

The Python script uses non-blocking console I/O to interact with the user. It needs the PySerial package which can be found here in case your Python install does not have it.

The MiniPirate sketch can be downloaded from here. Instructions on its use can be found here. Any questions? Leave a comment.

Arduino Leonardo WEB Server to Display Temperature and Humidity

In a previous post titled Arduino Leonardo and SPI Communications, I documented how to connect the Arduino Leonardo to the ENC28J60 Ethernet module. This post takes things a bit further and adds a DHT22 Sensor. The Arduino Leonardo is used as a WEB Server to Display Temperature and Humidity information from the DHT22 sensor.

The UIPEternet library is used to create a WEB server at IP Address 192.168.2.77 (which needs changed to whatever address would be appropriate for your LAN). The DHT library is used to communicate with the DHT22 sensor.

Here is the wiring graphic:

Leonardo  Enc28j60 DHT22You can get the Fritzing.org code to create that image here. When you visit the WEB page in a browser, here is what the page looks like:


DHT22 WEB Sample InformationHere is the DHT22_ENC28J60_WEB.ino source code to make it all happen:

Arduino Leonardo and SPI Communications

I just found out that my favorite Arduino of choice (the Leonardo) has a problem with SPI  “Serial Peripheral Interface” communications (if you need to use the SS pin).  For SPI (which is bidirectional) , the following pins are normally used:

  • SS – Slave Select – digital 10. You can use other digital pins, but 10 is generally the default as it is next to the other SPI pins (except for on the Leonardo)
  • MOSI  – Master Out / Slave In – digital 11;
  • MISO – Master In / Slave Out  – digital 12;
  • SCK – Serial Clock – digital 13;

Unlike the Arduino Uno, the Leonardo has those pins on the ICSP (In-Circuit Serial Programming) header except for the SS pin which is not available. I found that out when I tried to get my Leonardo to communicate with an ENC28J60 ethernet module. (See my earlier article on connecting an Arduino to a LAN via an ENC28J60 module. The Arduino is the master and the module is the slave.) To make the Arduino Leonardo and SPI communications work,I had to modify the library code to use a pin other than the Leornardo SS default. Here is the wiring diagram:

Leonardo ENC28J60

Arduino Leonardo SPI -> ENC28J60 (click to enlarge)

If you prefer my Fritzing.org source code from which this graphic was created, you can get it HERE. I use the UIPEthernet library for the ENC28J60 module. To make it work for the Leonardo, I changed the Enc28J60Network.h file in the utility directory. Find this line:

#define ENC28J60_CONTROL_CS     SS

and change it to this:

#define ENC28J60_CONTROL_CS     10

The only problem with modifying the library is that you will need to remember to always use pin 10 for SS if that is not already the default (when setting up SPI for other Arduinos). Here is a good article on connecting arduinos using SPI for your further research.

Nuqleo Zinq 7 Rooted for more flexible useage

I recently acquired a Nuqleo Zinc 7 Android Tablet. It looks like this:

Nuqleo Zinq 7I couldn’t resist 🙄 as it was such a good price. It comes with an OTG cable and works great to attach and host your Arduino(s).  Also, a tablet such as this one makes apps easier to use (i.e. to see) as a tablet has a larger screen area versus a phone.

In a previous article (HERE) I mention some useful Android apps to interface with your Arduino(s). There are also a number of things (i.e. commands / programs) that can be run from the command line if your Android device is ‘rooted‘. Being a Linux user from way way back, I like the flexibility to see what is going on and run various commands that are part of BusyBox. BusyBox combines tiny versions of many common UNIX/Linux utilities into a single small executable.

There are many methods (programs and scripts) around which take advantage of exploits to gain root (or super user) privileges. Some require your Android device to be hooked up via USB to another computer running Windows. Others (much simpler) are apps (apk files) which run directly on your android device.

Fortunately I found an apk that rooted my Zinq 7 quite easily called Baidu Root. I installed it and then installed the SuperSU apk to grant access rights to other programs and  Shell Terminal Emulator to access the command line. If you want an updated version of BusyBox, I suggest installing this BusyBox apk.

Controlling an Arduino from an Android Phone or Tablet

Question: What do you get when you connect your Android Phone or Tablet with a USB-OTG cable and connect that into another USB cable connected to an Arduino?

Android to Arduino

Connect an Android Device to an Arduino


Answer: A easy way to program and/or control your Arduino. This is a handy way to control (and/or re-program) your Arduinos in the field where it might be too inconvenient to use a laptop PC. The USB OTG cable tells the Android device to be the host and so the Arduino will be powered by the phone or tablet. Make sure your Android device is fully charged because this can drain the battery quickly. Also, make sure your Android device supports a USB OTG cable, not all do.

There are a number of Android apps that were created for both Electronics  and MicroControllers such as the PICs and Arduinos.

Here is a list of my favorite apps:

Electronics:   ElectroDroid  EveryCircuit  Electronics Toolkit

AVR: AVR Atmega Database

PIC:  PICmicro Database

Arduino:  ArduinoDroid   Arduino Examples    Arduino Companion   Arduino Commander   Arduino Libraries   Arduino Cheat Sheet

These apps are quite handy when you are ‘in the field’ and working on a project.  Note: the Arduino DUE has a USB host port, so you can plug your android phone or tablet directly into it, however the above mentioned apps only support the older IDE, they do not support the DUE.

Load more